Searched: \.*
Results from Main web retrieved at 13:37 (GMT)
boolean: true/false
float: 3.141592653
string: "qwerty"
list:
- "item 1"
- "item 2"
dictionary:
key1: "value 1"
key2: "value 2"
 See the Jinja2 documentation for a list of available tests: https://jinja.palletsprojects.com/en/2.9.x/templates/#list-of-builtin-tests
 Ivo van Geel - 21 Sep 2021
Go to AdBlock Plus Settings -> Advanced -> Add filter list via URL and enter: https://www.lanis.nl/hide_linkedin_ads_adblockplus.txt. This should keep the adblock list updated, using Jonathan Hult 's adblock list on GitHub. See: https://gist.github.com/jhult/802e89c64c4b6f27a3a9.
Thanks to Jonathan for creating the list!
-- Ivo van Geel - 09 Apr 2021 Ivo van Geel - 19 Feb 2015 Ivo van Geel - 30 Dec 2011 Ivo van Geel - 20 Jul 2022 ), so this guide is written with a RouterStation Pro in mind. It might work on other hardware as well.
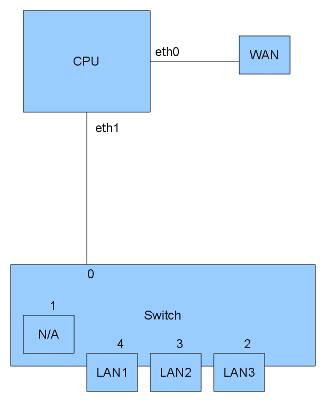 This is a simplified schematic of the inner workings of the RS Pro. As you can see eth0 connects to the internal switch. As far as I can tell the WAN port is not connected to the internal switch, but to a separate interface, eth1. Port 0 of the switch is connected to eth0. Port 1 of the switch is not connected and cannot be used. Ports 2 through 4 are connected to the LAN ports.
To be able to use separate VLANs, the switch needs to know which VLAN each port is on. This is accomplished by adding some extra information to each network packet leaving the CPU, the VLAN tag. The VLAN tag specifies which VLAN a packet belongs to (VLAN ID). Adding a VLAN tag to a network packets is called tagging. Adding a * after switchport 0 in the configuration file enables tagging and sets this port as the default VLAN (if no VLAN tag is present). The switch recognises the VLAN tag and uses the information in it to be able to send the packet to the right interface(s).
When booting with the above configuration, a new interface is created, named eth1.1, This is VLAN 1 on interface eth1. Use this interface in your network configuration:
Ivo van Geel - 05 Jan 2011 Ivo van Geel - 27 Feb 2011 Zo te zien hetzelfde model en dezelfde schaal, maar dan 244 euro goedkoper. Dan hoef je bovendien ook niet elke week op de postbode te wachten en te hopen dat je alle 120 zending goed ontvangt.
Zie: http://hmsvictory-model.com/faq.php
-- IvoVanGeel - 02 Mar 2011 Ivo van Geel - 15 Apr 2017 , rename it to update.zip and copying it to your sd-card. Reboot into the standard recovery image, by holding Volume-+ and the power button for a number of seconds. Pressing the Home button should then show the recovery options. Install update.zip via the menu options. This should create 2 files on the sd-card: dumped_recovery.img and dumped_proc_mtd.txt.
Download the ClockworkMod Recovery 5 for the Storage Options Scroll 7" capacitive device from http://androtab.info/telechips/cyanogenmod/, rename it to update.zip and install using the recovery menu.
See http://androtab.info/telechips/cyanogenmod/ for more information.
Ivo van Geel - 03 Nov 2011 Ivo van Geel - 28 Nov 2013
This is a simplified schematic of the inner workings of the RS Pro. As you can see eth0 connects to the internal switch. As far as I can tell the WAN port is not connected to the internal switch, but to a separate interface, eth1. Port 0 of the switch is connected to eth0. Port 1 of the switch is not connected and cannot be used. Ports 2 through 4 are connected to the LAN ports.
To be able to use separate VLANs, the switch needs to know which VLAN each port is on. This is accomplished by adding some extra information to each network packet leaving the CPU, the VLAN tag. The VLAN tag specifies which VLAN a packet belongs to (VLAN ID). Adding a VLAN tag to a network packets is called tagging. Adding a * after switchport 0 in the configuration file enables tagging and sets this port as the default VLAN (if no VLAN tag is present). The switch recognises the VLAN tag and uses the information in it to be able to send the packet to the right interface(s).
When booting with the above configuration, a new interface is created, named eth1.1, This is VLAN 1 on interface eth1. Use this interface in your network configuration:
Ivo van Geel - 05 Jan 2011 Ivo van Geel - 27 Feb 2011 Zo te zien hetzelfde model en dezelfde schaal, maar dan 244 euro goedkoper. Dan hoef je bovendien ook niet elke week op de postbode te wachten en te hopen dat je alle 120 zending goed ontvangt.
Zie: http://hmsvictory-model.com/faq.php
-- IvoVanGeel - 02 Mar 2011 Ivo van Geel - 15 Apr 2017 , rename it to update.zip and copying it to your sd-card. Reboot into the standard recovery image, by holding Volume-+ and the power button for a number of seconds. Pressing the Home button should then show the recovery options. Install update.zip via the menu options. This should create 2 files on the sd-card: dumped_recovery.img and dumped_proc_mtd.txt.
Download the ClockworkMod Recovery 5 for the Storage Options Scroll 7" capacitive device from http://androtab.info/telechips/cyanogenmod/, rename it to update.zip and install using the recovery menu.
See http://androtab.info/telechips/cyanogenmod/ for more information.
Ivo van Geel - 03 Nov 2011 Ivo van Geel - 28 Nov 2013
sunstudio12u1-patched-ii-2010Feb-sol-x86.tar.gz Ivo van Geel - 01 Aug 2013 Ivo van Geel - 13 Jun 2013 . Check the MD5 sum by running md5sum on CentOS-6.5-x86_64-netinstall.iso and compare the result to the MD5 sums at: ftp://ftp.tudelft.nl/pub/Linux/centos.org/6/isos/x86_64/md5sum.txt
Boot from the network install CD. Make sure you have at least 768MB of memory available, or you will not be able to create a custom harddisk layout.
Skip the disk checking after booting the install CD. Set the installation language to English. Select URL for the Installation Method and enter the following URL: ftp://ftp.tudelft.nl/pub/Linux/centos.org/6/os/x86_64/, after configuring the network. Use auto configuration, if possible.
Ivo van Geel - 17 Oct 2012 . Check the MD5 sum by running md5sum on CentOS-7-x86_64-NetInstall-2009.iso and compare the result to the SHA256 sums at: http://ftp.tudelft.nl/centos.org/7/isos/x86_64/sha256sum.txt.
Boot from the network install CD. Make sure you have at least 768MB of memory available, or you will not be able to create a custom harddisk layout.
Select Install CentOS 7 at the CD boot screen. Set the installation language to English; Keyboard: English (United States). Set the Date&Time options. Click the Installation Source setting, select Network and enter the correct URL: http://ftp.tudelft.nl/centos.org/7/os/x86_64/
Ivo van Geel - 19 Nov 2014 .
Check the SHA256 sum by running sha256sum on CentOS-8-x86_64-1905-boot.iso and compare the result to the SHA256 sums at: http://ftp.tudelft.nl/centos.org/8/isos/x86_64/CHECKSUM.
Boot from the install CD. Make sure you have at least 1024MB of memory available, or you will not be able to create a custom harddisk layout.
Select Install CentOS Linux 8.0.1905 at the CD boot screen. Set the installation language to English; Keyboard: English (United States).
Ivo van Geel - 07 Jan 2020 . Check the MD5 sum by running md5sum on ubuntu-12.04.4-server-amd64.iso and compare the result to the MD5 sums at: http://nl.releases.ubuntu.com/precise/MD5SUMS.
Boot from the install CD.
Select to boot in English and select Install Ubuntu Server. Ivo van Geel - 12 Feb 2014
Return to: IvoVanGeel Ivo van Geel - 18 Feb 2023
-- Ivo van Geel - 27 Feb 2011  Make sure your PC is turned off and keep pressing the BIOS flashback button on the motherboard for about 3 seconds. The BIOS flashback LED should now start blinking, which means it is being installed. I think it is blinking slow when the BIOS file is being read from USB and fast when it is being written to the motherboard. When the blinking stops, your new BIOS image has been installed (this can take up to 8 minutes). Turn on your PC, check the BIOS settings and see if the NVME SSD is recognized by UEFI.
Ivo van Geel - 03 Nov 2020
Make sure your PC is turned off and keep pressing the BIOS flashback button on the motherboard for about 3 seconds. The BIOS flashback LED should now start blinking, which means it is being installed. I think it is blinking slow when the BIOS file is being read from USB and fast when it is being written to the motherboard. When the blinking stops, your new BIOS image has been installed (this can take up to 8 minutes). Turn on your PC, check the BIOS settings and see if the NVME SSD is recognized by UEFI.
Ivo van Geel - 03 Nov 2020 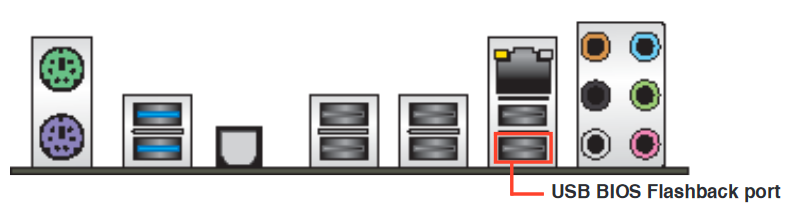 Make sure your PC is turned off and keep pressing the BIOS flashback button on the motherboard for about 3 seconds. The BIOS flashback LED should now start blinking, which means it is being installed. I think it is blinking slow when the BIOS file is being read from USB and fast when it is being written to the motherboard. When the blinking stops, your new BIOS image has been installed (this can take up to 8 minutes). Turn on your PC, check the BIOS settings and see if the Samsung XP941 SSD is recognized by UEFI.
Ivo van Geel - 03 Nov 2020
-- Ivo van Geel - 15 Jul 2017 Ivo van Geel - 17 Jul 2016 Ivo van Geel - 09 Jul 2022
Make sure your PC is turned off and keep pressing the BIOS flashback button on the motherboard for about 3 seconds. The BIOS flashback LED should now start blinking, which means it is being installed. I think it is blinking slow when the BIOS file is being read from USB and fast when it is being written to the motherboard. When the blinking stops, your new BIOS image has been installed (this can take up to 8 minutes). Turn on your PC, check the BIOS settings and see if the Samsung XP941 SSD is recognized by UEFI.
Ivo van Geel - 03 Nov 2020
-- Ivo van Geel - 15 Jul 2017 Ivo van Geel - 17 Jul 2016 Ivo van Geel - 09 Jul 2022  -- Ivo van Geel - 17 May 2020
Notes to TWiki Administrator: Anything inside this "templateonly" section will not be copied to the home topic of the new user. It is a resource for the administrator to tailor the users home topic. The default topic text above is for English speaking users. If you have a multilingual wiki community you can replace the "My Links", "Personal Preferences" and "Related Topics" sections above with the localized text below. Text enclosed in %MAKETEXT will be shown in the language selected by the user. Please note that the %MAKETEXT can be quite intimidating to new users. Consider translating above text to your own language if your community uses a non-English language. (Remove all text from Ivo van Geel - 23 Oct 2019 Ivo van Geel - 07 Jan 2014 Ivo van Geel - 16 Jun 2018 Ivo van Geel - 17 Sep 2020 Ivo van Geel - 20 Jan 2015
-- Ivo van Geel - 05 Jun 2013
Legend:
Notes:
To use the plugin, you will need to have virt-viewer installed, with SPICE support enabled. You will also need to install the following script:
/usr/libexec/spice-xpi-client-remote-viewer
Ivo van Geel - 19 Jul 2012  Both settings accept a comma-space delimited list of users and groups in WikiWord format. Groups can be nested.
 NOTE: If you lock yourself out of TWikiAdminGroup during setup activities or have forgotten the configure password, you can unset the configure password by editing the
IMPORTANT NOTE: Think twice before restricting write access to a web or a topic, because an open system where everybody can contribute is the essence of WikiCulture. Experience shows that unrestricted write access works very well because:


 Log In - if you already have an account
 Register - create an account to participate in this TWiki site
Starting points:
.
Related topics: UserList, TWikiRegistration
Register - create an account to participate in this TWiki site
Starting points:
.
Related topics: UserList, TWikiRegistration Site-level preferences are located in TWiki.TWikiPreferences, however this Main.TWikiPreferences prefs topic has override priority and should be used for local customizations. This allows for easier upgrades as you don't need to worry about the shipped preferences clobbering yours. It's easier to keep a handle on if you only copy over the settings you actually change.
Quick edit of existing preferences (edit the topic text to set new preferences)
Site-level preferences are located in TWiki.TWikiPreferences, however this Main.TWikiPreferences prefs topic has override priority and should be used for local customizations. This allows for easier upgrades as you don't need to worry about the shipped preferences clobbering yours. It's easier to keep a handle on if you only copy over the settings you actually change.
Quick edit of existing preferences (edit the topic text to set new preferences)
A B C D E F G H I J K L M N O P Q R S T U V W X Y Z Note: There are four default system users: for more information.
-- Ivo van Geel - 23 Jun 2014
Note: Please keep the TWikiRegistration form and this form definition in sync. When you update this form you need to edit/save the NewUserTemplate topic. This ensures that the fields are in the right order.
Related topics: TWikiUsers, UserViewTemplate, NewUserTemplate, UserHomepageHeader, TWikiForms, TWikiRegistration has some additional documentation and ideas on customizing the homepages.
Related topics: TWikiUsers, UserForm, NewUserTemplate, TWikiRegistration, TWikiForms is installed this page will show photos and names of all registered users. has some additional documentation and ideas on customizing the user profile pages. If you customize this topic make sure to reapply the changes after a TWiki upgrade.
Results from Main web retrieved at 13:37 (GMT)
All Authenticated Users Group
This is a special group all authenticated users belong. The main use of this group is to lift a web level restriction at the topic level. This is close to AllUsersGroup. The difference is that unauthenticated users belong to AllUsersGroup but not to AllAuthUsersGroup. Let's say a web is viewable only by the members of the DarkSideGroup by the following line on WebPreferences.* Set ALLOWWEBVIEW = Main.DarkSideGroupBy putting the following line on a topic, you can make it viewable by anybody authenticated.
* Set ALLOWTOPICVIEW = Main.AllAuthUsersGroupThis topic is not necessary for the group to work because the group is implemented in the code instead of a topic that has members. Related topics: TWikiGroups, AllUsersGroup, TWikiAccessControl
All Users Group
This is a special group literally all users belong. The main use of this group is to lift a web level restriction at the topic level. This is close to AllAuthUsersGroup. The difference is that unauthenticated users belong to AllUsersGroup but not to AllAuthUsersGroup. Let's say a web is viewable only by the members of the DarkSideGroup by the following line on WebPreferences.* Set ALLOWWEBVIEW = Main.DarkSideGroupBy putting the following line on a topic, you can make it viewable by anybody.
* Set ALLOWTOPICVIEW = Main.AllUsersGroupThis topic is not necessary for the group to work because the group is implemented in the code instead of a topic that has members. Related topics: TWikiGroups, AllAuthUsersGroup, TWikiAccessControl
Ansible tips & tricks
Ansible data types
integer: 3211241boolean: true/false
float: 3.141592653
string: "qwerty"
list:
- "item 1"
- "item 2"
dictionary:
key1: "value 1"
key2: "value 2"
YAML syntax
Split long lines
Use a backslash (\) to split long lines:
    - set_fact:
        msg: "This is the first part \
              and second part of the string"

    - debug:
        var: msg
Results in:
"msg": "This is the first part and second part of the string". Note that the space between 'part' and 'and' is before the backslash.
Use a greater-than sign (>) to split long lines, without interior line breaks:
    - set_fact:
        msg: >
          This is the first part
          and second part of the string

    - debug:
        var: msg
Results in:
"msg": "This is the first part and second part of the string\n"
Use a pipe sign (|) to split long lines, preserving interior line breaks:
    - set_fact:
        msg: |
          This is the first part
          and second part of the string

    - debug:
        var: msg
Results in:
"msg": "This is the first part \nand second part of the string\n"
Add a minus sign (-) after a greater-than or pipe symbol to remove the line break at the end of the line (use >- or |-)
See: https://stackoverflow.com/questions/3790454/how-do-i-break-a-string-in-yaml-over-multiple-linesDump all variables
---
- name: dump all
  hosts: all

  tasks:
    - name: Print some debug information
      vars:
        msg: |
          Module Variables ("vars"):
          --------------------------------
          {{ vars | to_nice_json }}

          Environment Variables ("environment"):
          --------------------------------
          {{ environment | to_nice_json }}

          GROUP NAMES Variables ("group_names"):
          --------------------------------
          {{ group_names | to_nice_json }}

          GROUPS Variables ("groups"):
          --------------------------------
          {{ groups | to_nice_json }}

          HOST Variables ("hostvars"):
          --------------------------------
          {{ hostvars | to_nice_json }}

      debug:
        msg: "{{ msg.split('\n') }}"
Magic variables
See: Special Variablesmanipulating data
Convert date to Unix time (epoch)
Use "{{ ('2023-02-28' | to_datetime('%Y-%m-%d')).strftime('%s') }}"Extract subitems from list of dictionaries
Use "{{ variable | map(attribute='key_name') | list }}"Select items from list of dictionaries
Use "{{ variable | selectattr('key_name', 'match', 'value') | list }}" Instead of selectattr, you can also use rejectattr. Instead of match, you can also use search or regex. See: https://docs.ansible.com/ansible/latest/user_guide/playbooks_tests.html#testing-stringsApply a filter to a list of items
Use "{{ variable | map('filter_name', 'filter_option1', 'filter_option2') | list }}" For example: "{{ output.stdout_lines | map('regex_replace', '^(\S+)\s.*$', '\\1') | list }}" Be careful on the context in which you use this. In some cases you must use a single backslash (displaying a variable with debug for example): '\1'Filter a list of strings
Use "{{ variable | select('match', 'some string') | list }}" Instead of match, you can also use search or regex. See: https://docs.ansible.com/ansible/latest/user_guide/playbooks_tests.html#testing-stringsSort list of dictionaries by subitem
Use "{{ variable | sort(attribute='key_name') }}"Searching a string in a when statement
Use: when: my_string is match(pattern) Instead of match, you can also use search or regex. See: https://docs.ansible.com/ansible/latest/user_guide/playbooks_tests.html#testing-stringsAdd a string to a string
Use "{{ string1 + string2 }}" Or: "{{ string1 + ', ' + string2 }}"Add item to list
Use "{{ variable | default([]) + [item] }}"Add item to dictionary
Use "{{ variable | default({}) | combine({key_name: key_value}) }}"Replace multiple lines using replace module (lineinfile does not support multi-line regexp)
Example:
- name: Comment out hint zone "." in named.conf
  replace:
    path: "/etc/named.conf"
    regexp: '^(zone\s+"\."\s+IN\s+{[^\n]*)\n(\s*type\s+hint;[^\n]*)\n(\s*file\s+"named\.ca";[^\n]*)\n(};)'
    replace: '# \1\n# \2\n# \3\n# \4'
Loop over network interfaces
Example, showing MTU size:
- debug:
    msg: "{{ ansible_facts[item]['mtu'] }}"
  with_items: "{{ ansible_interfaces }}"
Fixing incorrect module names
Run ansible-playbook with -vvv and look for lines containing redirecting. --Block LinkedIn Ads
Using AdBlock Plus, it is possible to block those annoying ads on linkedin.com.Go to AdBlock Plus Settings -> Advanced -> Add filter list via URL and enter: https://www.lanis.nl/hide_linkedin_ads_adblockplus.txt. This should keep the adblock list updated, using Jonathan Hult 's adblock list on GitHub. See: https://gist.github.com/jhult/802e89c64c4b6f27a3a9
Building oVirt Node with VDSM plugin
Introduction
This document explains how to build oVirt Node 3.5 with the VDSM (Virtual Desktop and Server Manager) plugin. This plugin is needed to be able to manage the node from oVirt Engine. The image will be built on CentOS7.Preparation
Perform a clean, minimal install of CentOS7. Install the latest updates, using: yum upgrade. Install the following extra packages:yum install -y https://dl.fedoraproject.org/pub/epel/7/x86_64/e/epel-release-7-5.noarch.rpm # (or a later version) yum install -y http://resources.ovirt.org/pub/ovirt-3.5/rpm/el7/noarch/ovirt-release35-002-1.noarch.rpm # (or a later version) yum install -y git python-devel createrepo selinux-policy-doc checkpolicy selinux-policy-devel autoconf ltrace automake \ python-mock pykickstart python-lockfile bzip2 gcc gcc-c++ patch redhat-rpm-config rpm-build unzip yum install -y ovirt-node-plugin-vdsm-recipeThe livecd-tools and appliance-tools packages, which are needed for building the ISO file, are not provided in the default CentOS7 repositories, but they can be installed from other places:
yum install -y http://people.centos.org/arrfab/CentOS7/LiveMedia/RPMS/python-imgcreate-20.1-2.el7.x86_64.rpm
yum install -y http://people.centos.org/arrfab/CentOS7/LiveMedia/RPMS/hfsplus-tools-540.1.linux3-4.el7.x86_64.rpm
yum install -y http://people.centos.org/arrfab/CentOS7/LiveMedia/RPMS/livecd-tools-20.1-2.el7.x86_64.rpm
yum install -y https://kojipkgs.fedoraproject.org//packages/appliance-tools/007.7/1.fc21/noarch/appliance-tools-minimizer-007.7-1.fc21.noarch.rpm
Build oVirt Node packages
Download the ovirt-node source code via git:git clone http://gerrit.ovirt.org/p/ovirt-node.gitI have created a script to easily build the oVirt node packages (please note I am building in /root): build-node.sh:
#!/bin/bash

export OVIRT_NODE_BASE=/root

export OVIRT_CACHE_DIR=~/ovirt-cache
export OVIRT_LOCAL_REPO=file://${OVIRT_CACHE_DIR}/ovirt
export EXTRA_RELEASE=.$USER$(date +%s)

cd $OVIRT_NODE_BASE
cd ovirt-node

make distclean
./autogen.sh --with-image-minimizer
make publish
Make the file executable using: chmod a+rx build-node.sh and build the packages using: ./build-node.sh
Build oVirt Node ISO file
Download the source code for building an ovirt-node ISO file via git:git clone http://gerrit.ovirt.org/p/ovirt-node-iso.git ovirt-node-iso-vdsmBefore building a few extra packages need to be installed from the ovirt-node directory:
yum -y install /root/ovirt-node/tmp.repos/RPMS/noarch/ovirt-node-recipe-3.2.3-0.0.master.el7.centos.noarch.rpmTo build the oVirt Node ISO with the VDSM plugin, 2 files need to be changed: ovirt-node-iso-vdsm/configure.ac:
MAIN_KS=vdsm-plugin-iso.ksovirt-node-iso-vdsm/Makefile.am:
NAME0 = vdsm-plugin-isoFor the hardware I am using to run oVirt, I need to have the Realtek network firmware installed. I made the following change to /usr/share/ovirt-node-recipe/common-minimizer.ks:
keep /lib/firmware/rtl_nicI have used the following script to build the ISO file: build-node-vdsm.sh:
#!/bin/bash

export OVIRT_NODE_BASE=/root

export OVIRT_CACHE_DIR=~/ovirt-cache
export OVIRT_LOCAL_REPO=file://${OVIRT_CACHE_DIR}/ovirt
export EXTRA_RELEASE=.$USER$(date +%s)

cd $OVIRT_NODE_BASE
cd ovirt-node-iso-vdsm

rm -f *.iso
make distclean
./autogen.sh --with-recipe=/usr/share/ovirt-node-recipe --with-build-number=01
make iso publish
Set the script to be executable and build the ISO:
chmod a+rx build-node-vdsm.sh
./build-node-vdsm.sh
Install oVirt Node
Use dd to create a bootable USB stick, which can be used to install oVirt Node:dd if=ovirt-node-iso-vdsm/ of=/dev/<USB stick> bs=1MBoot from the USB stick to start the installer. After the installer has completed, reboot the machine. Next configure the network, go to the oVirt Engine section and set the root password here. This will also enable the SSH daemon. You will need the password you enter here, to add the node to the oVirt Engine. --
%TMPL:INCLUDE{"view"}%
%TMPL:DEF{"active_form"}%Edit personal data%TMPL:END%
%TMPL:DEF{"inactive_form"}% %TMPL:END%
%TMPL:DEF{"inactive_edit"}%Edit text%TMPL:END%
%TMPL:DEF{"create_topic"}%Create%TMPL:END%
%TMPL:DEF{"edit_topic"}%Edit text%TMPL:END%
%TMPL:DEF{"active_edit"}%%TMPL:END%
%TMPL:DEF{"content"}%
%TEXT%%TMPL:END%
%TEXT%
Topic revision: r1 - 17 Apr 2006 - TWikiContributor
Connecting to an iSCSI server from Linux
IMPORTANT: never stop or kill the iscsid daemon while iSCSI disks are still present!Introduction
This document describes how to connection to an iSCSI server using Open-iSCSI from a Linux machine. I will asume Open-iSCSI has alread been installed First setup the Initiator name in /etc/iscsi/initiatorname.iscsi. For example:InitiatorName=iqn.2001-04.org.gentoo:client InitiatorAlias=clientNext setup authenticaion options in /etc/iscsi/iscsid.conf, if needed. For example:
node.session.auth.authmethod = CHAP
node.session.auth.username = username
node.session.auth.password = password

discovery.sendtargets.auth.authmethod = CHAP
discovery.sendtargets.auth.username = username
discovery.sendtargets.auth.password = password
Setting up iSCSI interface
Creating a new iSCSI interface
iscsiadm -m iface -I iface0 -o new
Configuring an existing iSCSI interface
iscsiadm -m iface -I iface0 -o update -n iface.initiatorname -v iqn.2001-04.org.gentoo:client
This configures the interface initiatorname (sets it to qn.2001-04.org.gentoo:client in this example)
iscsiadm -m iface -I iface0 -o update -n iface.ipaddress -v 192.168.2.2
This configures interface iface0 to use 192.168.2.2 as the source IP address. It also possible to use the interface name (iface.net_ifacename) or MAC address (iface.hwaddress)
Showing iSCSI interface settings
Useiscsiadm -m iface -I iface0 -o show to show information about an interface (iface0 in this case).
Deleting an existing iSCSI interface
iscsiadm -m iface -I iface0 -o delete
Set up iSCSI target discovery
add iSCSI discovery target
Use the sendtargets method discover targets on 192.168.2.4, using the configured username / password:iscsiadm -m discovery -t sendtargets -p 192.168.2.4:3260 -I iface0
show iSCSI discovery settings
iscsiadm -m discovery -p 192.168.2.4:3260
remove iSCSI discovery target
To disable discovery for the 192.168.2.4 target, use:iscsiadm -m discovery -o delete -p 192.168.2.4:3260
Connecting to iSCSI target disks
--Create custom OpenFietsMap
- Create a directory for the openfietsmap files: mkdir openfietsmap
- Go into this directory: cd openfietsmap
- Clone the mkgmap style sheets repository: git clone https://github.com/ligfietser/mkgmap-style-sheets.git
- Copy the mkgmap style sheets to the current directory: cp -r "mkgmap-style-sheets/styles/Openfietsmap full"/* .
- Create a directory Styles
- Copy the Openfietmap Full style directory to Styles: cp -r "mkgmap-style-sheets/styles/Openfietsmap full"/* Styles/
- Copy the file 20011.txt from the Openfietsmap lite directory: cp "mkgmap-style-sheets/typ/Openfietsmap lite"/20011.txt .
- Download the file cities15000.txt from: http://download.geonames.org/export/dump/cities15000.zip (unzip to get .txt)
- Download splitter from: https://www.mkgmap.org.uk/download/splitter.html (splitter-r653.zip)
- Download mkgmap from: https://www.mkgmap.org.uk/download/mkgmap.html (mkgmap-r4916.zip)
- Download sea-latest.zip from https://www.thkukuk.de/osm/data/sea-latest.zip and rename to sea.zip
- Download bounds-latest.zip from https://www.thkukuk.de/osm/data/bounds-latest.zip and rename to bounds.zip
- Extract splitter and mkgmap using unzip
- Create a directory DEM: mkdir DEM
- Go to https://geo.javawa.nl/srtm/index.php, select the region you are using and download each file listed on the right (use the lowest resolution available)
- Extract and move the contents of all height maps to the DEM directory
- Edit mkgmap.args and replace map_with_dem_files with DEM
- Create bounding box using: https://boundingbox.klokantech.com/
- Draw polygon around desired area. Select KML in the lower left corner and click the copy to clipboard icon
- Paste the KML data into a new file (it is not actually in KML format). Edit the ploygon file to list coordinates 1 per line, start each line with 2 spaces, replace comma (,) with 2 spaces
- Add header:
- beneluxswgermany
- 1
- Add footer:
- END
- END
- Save the file as beneluxswgermany.poly (See beneluxswgermany.poly)
- Download .osm.bpf file from http://download.geofabrik.de/europe.html
- Split Europe files in pieces and limit to polygon:
- java -Xms4096m -Xmx4096m -jar <path/to/splitter.jar> --output=pbf --output-dir=splitter --max-nodes=1400000 --mapid=10010001 --geonames-file=cities15000.txt --polygon-file=beneluxswgermany.poly europe-latest.osm.pbf
- Create image file for installing on Garmin:
- java -Xms4096m -Xmx4096m -jar <path/to/mkgmap.jar> --gmapsupp -c mkgmap.args -c splitter/template.args 20011.txt
See also
--Creating and using VLANs in OpenWRT Backfire
Introduction
I have been struggling to create VLANs in OpenWRT Backfire (10.3) and couldn't really find the information I needed on the web. So I decided to write a brief summary of steps you need to take to set it up properly. I personally own a Ubiquiti RouterStation Pro (I can recommend buying one, see http://www.ubnt.com/rsproConfiguration
The file you need to change to setup the VLANs for you is/etc/config/network. The default file looks something like this:
config interface loopback
        option ifname   lo
        option proto    static
        option ipaddr   127.0.0.1
        option netmask  255.0.0.0

config interface lan
        option ifname   eth1
        option type     bridge
        option proto    static
        option ipaddr   192.168.1.1
        option netmask  255.255.255.0

config interface wan
        option ifname   eth0
        option proto    dhcp

config switch
        option name     eth1
        option reset    1
        option enable_vlan 1

config switch_vlan
        option device   eth1
        option vlan     1
        option ports    "0 1 2 3 4"
The internal switch is configured to use only 1 VLAN (vlan 1) on all ports (0 through 4). None of the ports on the switch is tagged, since there is no * or t after any of the ports in the switch_vlan configuration.
Tagging the internal interface
The first thing we need to do is activate tagging on the internal network port, connected to the CPU, port 0. Change the switch_vlan section to read:
config 'switch_vlan'
        option 'device' 'eth1'
        option 'vlan' '1'
        option 'ports' '0* 1 2 3 4'
A picture will help explain this setup:
This is a simplified schematic of the inner workings of the RS Pro. As you can see eth0 connects to the internal switch. As far as I can tell the WAN port is not connected to the internal switch, but to a separate interface, eth1. Port 0 of the switch is connected to eth0. Port 1 of the switch is not connected and cannot be used. Ports 2 through 4 are connected to the LAN ports.
To be able to use separate VLANs, the switch needs to know which VLAN each port is on. This is accomplished by adding some extra information to each network packet leaving the CPU, the VLAN tag. The VLAN tag specifies which VLAN a packet belongs to (VLAN ID). Adding a VLAN tag to a network packets is called tagging. Adding a * after switchport 0 in the configuration file enables tagging and sets this port as the default VLAN (if no VLAN tag is present). The switch recognises the VLAN tag and uses the information in it to be able to send the packet to the right interface(s).
When booting with the above configuration, a new interface is created, named eth1.1, This is VLAN 1 on interface eth1. Use this interface in your network configuration:
config interface lan
        option ifname   eth1.1
        option type     bridge
        option proto    static
        option ipaddr   192.168.1.1
        option netmask  255.255.255.0
Creating a new VLAN
To create a new VLAN, we need to add a new section to the network configuration file, for example:
config 'switch_vlan'
        option 'device' 'eth1'
        option 'vlan' '2'
        option 'ports' '0t'
This section adds a new interface to the router, named eth1.2, VLAN 2 on interface eth1. This VLAN is connected to port 0, the CPU, but not to any other ports. You will not be able to access this VLAN yet. You will also notice this VLAN is tagged, as specified by the t after port 0. Using a t instead of a *, enables tagging, but does not set the port to be the default VLAN (which is VLAN 1 in our configuration).
Assigning a VLAN to a port
To be able to access other VLANs we need to move ports from the default VLAN to another VLAN. For example:
config 'switch_vlan'
        option 'device' 'eth1'
        option 'vlan' '1'
        option 'ports' '0* 1 3 4'

config 'switch_vlan'
        option 'device' 'eth1'
        option 'vlan' '2'
        option 'ports' '0t 2'
Port 2 has been removed from the VLAN 1 configuration and added to the VLAN 2 configuration. Since port 2 is not tagged, the switch will remove any VLAN tags before sending out packets to port(s). Since no tagging is done on port 2, you can attach any computer to it and access the network like you normally would, without any regards for VLANs or VLAN tags.
Configuring the new VLAN interface
Having configured port 2 to connect to VLAN 2, we still need to configure an IP address on it. Add the following section to the network configuration file:
config 'interface' 'dmz'
        option 'ifname' 'eth1.2'
        option 'proto' 'static'
        option 'netmask' '255.255.255.0'
        option 'ipaddr' '192.168.2.1'
The interface name (dmz in this case) can be used with the config_get utility, to dynamically determine the interface, for example:
config_get DMZ dmz ifnameAdding this line to a script will set the variable $DMZ to the interfacename of the dmz interface, eth1.2 in our setup.
Configuring a port with multiple, tagged VLANs
I would recommend against using multiple VLANs on 1 machine, because it can become a routing nightmare. It is also possible to assign more than 1 VLAN to a switch port. This port will need to be tagged and any computer connected to this port will need to be able to handle the VLAN tag. Lets change our setup, so port 2 is connected to VLAN 1 and VLAN 2:
config 'switch_vlan'
        option 'device' 'eth1'
        option 'vlan' '1'
        option 'ports' '0* 1 2t 3 4'

config 'switch_vlan'
        option 'device' 'eth1'
        option 'vlan' '2'
        option 'ports' '0t 2t'
As you can see port 2 is present in both VLAN configurations and is tagged in both places. To connect a Linux machine to this port and be able to access both VLANs, you need to install a packges called vconfig or vlan and set up multiple network configuration files, 1 for each VLAN you want to access. For example:
Gentoo (/etc/conf.d/net)
lans_eth0="1 2"
config_eth0=( "null" )
vconfig_eth0=( "set_name_type VLAN_PLUS_VID_NO_PAD" )
config_vlan1=( "192.168.1.2/24" )
config_vlan2=( "192.168.2.2/24" )
Red Hat ES 5 / CentOS 5 (/etc/sysconfig/network-scripts/ifcfg-vlan2)
VLAN=yes
VLAN_NAME_TYPE=VLAN_PLUS_VID_NO_PAD
DEVICE=vlan2
PHYSDEV=eth0
BOOTPROTO=static
ONBOOT=yes
TYPE=Ethernet
IPADDR=192.168.2.2
NETMASK=255.255.255.0
Debian / Ububtu (/etc/network/interfaces)
auto vlan2

iface vlan2 inet static
address 192.168.2.2
netmask 255.255.255.0
network 192.168.2.0
broadcast 192.168.2.255
mtu 1500
vlan_raw_device eth0
--
Gentoo Tips And Tricks
Updating world
Use:emerge -a -u --deep --newuse world 2>&1 | tee emerge-world.txt
Check the messages at the end of emerge-world.txt, to see if you need to reconfigure your system after packages have been upgraded.
To make sure you did not break any library dependencies. Run revdep-rebuild after a world upgrade.
Cleaning old packages after updating world
After updating world, remove old or unneeded packages using:emerge -a --depclean.
After this, you need to check the dependencies of all installed packages using: revdep-rebuild.
Overriding environment settings
For some packages, you may need to override environment settings from make.conf. Do this by creating a file called:- /etc/portage/env/[category]/[package] or
- /etc/portage/env/[category]/[package]-[version]
export CFLAGS="-O2 -march=athlon64 -pipe"
export CXXFLAGS="${CFLAGS}"
-- Wat kost het om de HMS Victory te bouwen ?
Ik zag op TV een aantal keer een reclame voorbij komen voor het bouwen van een model van de HMS Victory (schaal 1:84) van DeAgostini. Ik vroeg me af wat de totale kosten van dit, overigens prachtige, model zouden zijn. Een kleine rekensom levert:119 * 6,95 euro + 1 * 2,95 euro = 830 euroIn totaal zou het dus 830 euro kosten om het model helemaal op te bouwen. Een hoop geld, wat mij betreft. Het enige voordeel dat ik kan verzinnen is dat je op tijd kunt stoppen als je geen zin meer hebt om het complete model af te maken. Na even snel rondkijken op Internet kwam ik deze pagina tegen: http://www.modelbouwdekombuis.nl/Webwinkel-Product-3622869/H.M.S.-Victory.html
Hacking the Linksys EA6900
Specs:- PCB label: 48SAB406.OGC
- CPU: BCM4708A0 (BCM4708A0KFEBG)
- Memory: HK Hynix H5TQ2G63DFR-PBC 256MB
- 802.11 chips: 2x Broadcom BCM4360KMLG
- Flash memory: Spansion S34ML01G100TF100 128MB
Hacking the Yarvik / Sweex TAB250
Hardware
The Yarvik / Sweex TAB250 is built using the following ICs:- TCC8902
- Telechips 8902 SoC CPU / GPU / etc.
- 2x Samsung K4T1G164QF-BCE7
- 1Gbit DDR2 memory
- Hynix H27UBG8T2ATR
- 4GB NAND flash memory
- Realtek ALC5621
- Audio codec IC
- Focaltech FT5406EE8
- Touchpad controller
- AXP192
- Enhanced single Cell Li-Battery and Power System Management IC
- Realtek RTL8188CUS
- IEEE 802.11b/g/n 1T1R WLAN Controller with USB2.0 Interface
Connecting the TAB250 to your PC
To be able to log in to the TAB250 as root, you need to connect the tablet to a Windows computer, with the Android platform tools installed (ADB) and the USB drivers for the Telechips TCC8902. The USB drivers can be found by Googling for usb_inf_X5A.zip. After starting adb shell, a shell is opened on the tablet, running as user root. Starting a shell using Terminal Emulator (or another app) will not run as root, but as a user with limited privileges.Installing ClockworkMod Recovery 5
PLEASE NOTE: This procdure may brick or otherwise damage your tablet and make it unusable (but a nice coaster). To be able to recover your device after flashing a new ROM, you should first install a different recovery image. The recovery image can be used to create a backup or restore a working ROM, or copy files to / from your computer. First, create a backup of the original recovery image, by downloading http://files.androtab.info/telechips/dump-recovery/dump-recovery-signed.zipCreating a backup using ClockworkMod Recovery 5
Boot into the recovery image and create a backup of the default ROM, using the menu options. Copy all backup-files on the sd-card to a safe place. --How to Build Cyanogenmod 10.2 for Samsung Galaxy S Plus
Install repo utility
Create the directory $HOME/bin if it does not exist yet:mkdir $HOME/bin
Fetch the repo utility code:
curl http://commondatastorage.googleapis.com/git-repo-downloads/repo > $HOME/bin/repo
Make the repo utility script executable by running:
chmod a+rx $HOME/bin/repo
Add the $HOME/bin directory to your PATH (if not already present):
export PATH=${PATH}:$HOME/bin
Check out Cyanogenmod 10.2 Source Code
Create a directory to hold the CM 10.2 source code:mkdir /work/CM10.2 cd /work/CM10.2Now check out the source code using:
repo init -u git://github.com/CyanogenMod/android.git -b cm-10.2
repo sync
Get prebuilt apps
Navigate to the vendor/cm directory and runget-prebuilts:
(cd vendor/cm; ./get-prebuilts)
Get Galaxy S Plus specific code
Run the following command to checkout the Samsung Galaxy S Plus specific directory:(cd device/samsung; git clone git://github.com/AriesVE-DevCon-TEAM/android_device_samsung_ariesve.git -b cm-10.2 ariesve)This will check out the code into the directory device/samsung/ariesve Run the following command to fetch the vendor code (into vendor/samsung/ariesve):
mkdir vendor/samsung
(cd vendor/samsung; git clone git://github.com/ivendor/android_vendor_samsung_ariesve.git -b jellybean ariesve)
Run the following command to fetch the Samsung Galaxy S Plus kernel source code:
(cd kernel/samsung; git clone https://github.com/AriesVE-DevCon-TEAM/samsung-kernel-msm7x30.git -b cm-10.2 msm7x30)
Fixing problems with repository
Execute the following commands to fix problems in the CM10.2 repositories:cp hardware/qcom/media/mm-core/inc/QCMediaDefs.h frameworks/av/media/libstagefright/ cp hardware/qcom/media/mm-core/inc/QCMetaData.h frameworks/av/media/libstagefright/ cp hardware/qcom/media/mm-core/inc/QOMX_AudioExtensions.h frameworks/av/media/libstagefright/ cp hardware/qcom/media/mm-core/inc/OMX_QCOMExtns.h frameworks/av/media/libstagefright/ cp hardware/qcom/media/mm-core/inc/QCMediaDefs.h frameworks/av/media/libmediaplayerservice
Building
Prepare your shell for building the code by running:. build/envsetup.shNow start the build by running:
brunch ariesve--
How To Build OpenSolaris 2009.06
Needed software
You will need a specially patched version of the Sun Studio 12 Compiler. Download it here: sunstudio12-patched-ii-2009Sep-sol-x86.tar.bz2sunstudio12u1-patched-ii-2010Feb-sol-x86.tar.gz
Prepare the environment
Install the following packages:pkg install -v \ pkg:/data/docbook \ pkg:/developer/astdev \ pkg:/developer/build/make \ pkg:/developer/build/onbld \ pkg:/developer/illumos-gcc \ pkg:/developer/gnu-binutils \ pkg:/developer/opensolaris/osnet \ pkg:/developer/java/jdk \ pkg:/developer/lexer/flex \ pkg:/developer/object-file \ pkg:/developer/parser/bison \ pkg:/developer/versioning/mercurial \ pkg:/library/glib2 \ pkg:/library/libxml2 \ pkg:/library/libxslt \ pkg:/library/nspr/header-nspr \ pkg:/library/perl-5/xml-parser \ pkg:/library/security/trousers \ pkg:/print/cups \ pkg:/print/filter/ghostscript \ pkg:/runtime/perl-510 \ pkg:/runtime/perl-510/extra \ pkg:/runtime/perl-510/module/sun-solaris \ pkg:/system/library/math/header-math \ pkg:/system/library/install \ pkg:/system/library/dbus \ pkg:/system/library/libdbus \ pkg:/system/library/libdbus-glib \ pkg:/system/library/mozilla-nss/header-nss \ pkg:/system/header \ pkg:/system/management/product-registry \ pkg:/system/management/snmp/net-snmp \ pkg:/text/gnu-gettext \ pkg:/library/python-2/python-extra-26 \ pkg:/web/server/apache-13Extract the SunStudio 12 compilers needed to build OpenSolaris:
mkdir -p /opt/SUNWspro
cd /opt/SUNWspro
sudo tar xjf /path/to/sunstudio12-patched-ii-2009Sep-sol-x86.tar.bz2
sudo tar xzf /path/to/sunstudio12u1-patched-ii-2010Feb-sol-x86.tar.gz
--
Importing a certificate into a Java keystore
This document describes the steps needed to import / convert a certificate into a Java Keystore. The Keystore can be used with Tomcat, or other Java applications.Converting the certificate to PKCS12 format
Execute the following command to convert a x509 encoded certificate and private key to a PKCS12 encoded certificate:openssl pkcs12 -export -in <certificate.crt> -inkey <certificate.key> -out <certificate.p12> -name <cert-name> -CAfile <cacert.pem> -caname <ca-name> -chainPlease write down the passphrase you used to encode the PKCS12 encoded certificate, you will need it in later steps.
Importing the PKCS12 certificate into a keystore
Convert the PKCS12 encoded certificate into a Java keystore, by executing:keytool -importkeystore -srckeystore <certificate.p12> -srcstoretype PKCS12 -srcstorepass '<PKCS12 passphrase>' -alias tomcat -deststorepass '<keystore password> -destkeypass '<keystore password>' -destkeystore <keystore filename>
Adding the root CA into the keystore
keytool -import -trustcacerts -alias <CA> -file <cacert.pem> -keystore <keystore filename>--
Installing CentOS 6
Please note: This instruction was created for my personal use. Feel free to follow it, but I am not responsible for any problems or data loss! Download the network install CD, which can be found at: ftp://ftp.tudelft.nl/pub/Linux/centos.org/6/isos/x86_64/CentOS-6.5-x86_64-netinstall.iso- Select the U.S. English keyboard layout.
- Select Basic Storate Devices (unless you are installing to a SAN).
- Enter the hostname you would like to use (do not add the domain name).
- Select the correct timezone and make sure System uses UTC is enabled.
- Enter the root password.
- Select Create Custom Layout and create a primary partition for the OS and one for swap (create a swap partition as large as the amount of memory you have).
- Use the provided boot loader configuration.
- Select the Minimal installation option.
- Wait for the installation to finish.
- Reboot the system.
- Add the EPEL repository by running: rpm -Uvh https://fedora-archive.ip-connect.vn.ua/epel/6/x86_64/epel-release-6-8.noarch.rpm
- Add the noatime option to all ext3/ext4 filesystem options in /etc/fstab
- Edit /boot/grub/menu.lst and remove the rhgb and quiet options
- Edit /etc/rc.local and add the following line:
/usr/bin/setterm -blank 0This will prevent the screen from going black, which may be helpful in case of a kernel problem. - Update the system:
yum upgrade - Add a normal user, to log in as: useradd -m username
- Set a password: passwd username
- Edit the sudoers file by running: visudo
- Comment out the line:
Defaults requiretty - Comment out the line:
Defaults visiblepw - Enable users in the group wheel to use sudo, by uncommenting:
%wheel ALL=(ALL) ALL
- Comment out the line:
- Add the normal user to the wheel group:
usermod -a -G wheel username - Make sure root cannot log in via ssh by changing /etc/ssh/sshd_config:
-
PermitRootLogin without-password - This will disable logging in as root, via ssh, but it is still possible to log in as root using SSH public key authentication.
-
- Disable the firewall (when in a secure network), by running:
chkconfig iptables off; chkconfig ip6tables off - Add the following line to /etc/sysconfig/network:
-
NOZEROCONF=yes
-
- Install the following packages:
yum install -y irqbalance sysstat iotop strace tcpdump lsof ntp man man-pages man-pages-overrides mlocate wget openssh-clients perl iptraf-ng bind-utils vim-enhanced atop
- Enable irqbalance:
chkconfig irqbalance on(only useful on an SMP system) - Set up /etc/ntp.conf:
driftfile /var/lib/ntp/drift
restrict default kod nomodify notrap nopeer noquery
restrict -6 default kod nomodify notrap nopeer noquery
restrict 127.0.0.1
restrict -6 ::1
server 0.nl.pool.ntp.org
server 1.nl.pool.ntp.org
server 2.nl.pool.ntp.org
server 3.nl.pool.ntp.org
- Change /etc/ntp/step-tickers:
0.nl.pool.ntp.org
1.nl.pool.ntp.org
- Enable ntpdate and ntpd:
chkconfig ntpdate on; chkconfig ntpd on - Reboot the system to activate all changes
Installing CentOS 7
Please note: This instruction was created for my personal use. Feel free to follow it, but I am not responsible for any problems or data loss! Download the network install CD, which can be found at: http://ftp.tudelft.nl/centos.org/7/isos/x86_64/CentOS-7-x86_64-NetInstall-2009.iso- Select the U.S. English keyboard layout.
- Select Basic Storate Devices (unless you are installing to a SAN).
- Enter the hostname you would like to use (do not add the domain name).
- Select the correct timezone and make sure System uses UTC is enabled.
- Enter the root password.
- Select Create Custom Layout and create a primary partition for the OS and one for swap (create a swap partition as large as the amount of memory you have).
- Use the ext4 filesystem for all partitions (instead of XFS)
- Use the provided boot loader configuration.
- Select the Minimal installation option.
- Wait for the installation to finish.
- Reboot the system.
- Add the EPEL repository by running:
yum install epel-release - Install the following packages:
yum install -y yum-utils sysstat iotop strace tcpdump lsof ntp ntpdate man man-pages mlocate wget perl iptraf-ng bind-utils net-tools psmisc vim-enhanced rsync lynx atop screen
- Add the
noatimeoption to all ext3/ext4/XFS/etc filesystem options in /etc/fstab - Edit /etc/default/grub and remove the rhgb and quiet options from GRUB_CMDLINE_LINUX. Replace these options with: nomodeset vga=normal consoleblank=0 (add elevator=none when running on an SSD or in a VM)
- Create a new grub2 config file using:
grub2-mkconfig > /boot/grub2/grub.cfg - Update the system:
yum upgrade - Add a normal user, to log in as:
useradd -m username - Set a password:
passwd username - Add the normal user to the wheel group:
usermod -a -G wheel username - Make sure root cannot log in via ssh by changing /etc/ssh/sshd_config:
-
PermitRootLogin prohibit-password - This will disable logging in as root, via ssh, but it is still possible to log in as root using SSH public key authentication.
-
- Disable SELinux by setting
SELINUX=disabledin /etc/sysconfig/selinux (a reboot is needed to fully disable SELinux. Do not disable SELinux for production systems) - Disable the firewall (when in a secure network), by running:
systemctl disable firewalld - Enable irqbalance:
systemctl enable irqbalance.service(only useful on an SMP system) - Set up /etc/ntp.conf:
driftfile /var/lib/ntp/drift
restrict default nomodify notrap nopeer noquery
restrict 127.0.0.1
restrict ::1
server 0.nl.pool.ntp.org
server 1.nl.pool.ntp.org
server 2.nl.pool.ntp.org
server 3.nl.pool.ntp.org
- Change /etc/ntp/step-tickers:
0.nl.pool.ntp.org
1.nl.pool.ntp.org
- Enable ntpdate and ntpd:
systemctl enable ntpdate ; systemctl enable ntpd - Reboot the system to activate all changes
Installing CentOS 8
Please note: This instruction was created for my personal use. Feel free to follow it, but I am not responsible for any problems or data loss! Download the boot install CD, which can be found at: http://ftp.tudelft.nl/centos.org/8/isos/x86_64/CentOS-8-x86_64-1905-boot.iso- Under SYSTEM:
- Click Installation Destination
- Make sure only 1 disk is selected
- Set Storage Configuration to: Custom
- Enable Encrypt my data, if desired
- Click Done
- Use the following partitioning scheme: Standard Partition
- Click on: Click here to create them automatically
- Change all non-swap partitions to use Ext4 instead of XFS
- Click Done
- Click Accept Changes (note: this will destroy all data on this disk)
- Disable KDUMP
- Click Network & Host Name
- Fill in the desired host name
- Configure each network interface (Enable automatically connect to this network, set Link Negotioation to Automatic, set IPv6 method to: Ignore, when not using IPv6)
- Click Done
- Under LOCALIZATION:
- Leave keyboard set to English (US)
- Leave Language Support set to: English (United States)
- Click Time & Date
- Select the correct Region and City
- Make sure Network Time is enabled (Change the settings, when needed)
- Click Done
- Under SOFTWARE:
- Click the Installation Source setting, select http:// and set the URL to: http://ftp.tudelft.nl/centos.org/8/BaseOS/x86_64/os/
- Go to Software Selection and select Minimal Install
- Click the Installation Source setting, select http:// and set the URL to: http://ftp.tudelft.nl/centos.org/8/BaseOS/x86_64/os/
- Click on Begin Installation
- Set the Root password
- Create a user for yourself and enable: Make this user administrator
- Wait for the installation to finish
- Reboot the system
- Add the EPEL repository by running: dnf install epel-release
- Install the following packages:
dnf install -y sysstat iotop strace tcpdump lsof man man-pages mlocate wget perl iptraf-ng bind-utils net-tools psmisc vim-enhanced rsync chrony atop
- Add the noatime option to all ext3/ext4/XFS/etc filesystem options in /etc/fstab
- Edit /etc/default/grub and remove the rhgb and quiet options from GRUB_CMDLINE_LINUX. Replace these options with: nomodeset vga=normal consoleblank=0 (add elevator=deadline when running on an SSD or in a VM)
- Create a new grub2 config file using:
grub2-mkconfig > /boot/grub2/grub.cfg - Update the system:
dnf upgrade - Make sure root cannot log in via ssh by changing /etc/ssh/sshd_config:
-
PermitRootLogin prohibit-password - This will disable logging in as root, via ssh, but it is still possible to log in as root using SSH public key authentication.
-
- Optional: Set SELinux to permissive mode by setting
SELINUX=permissivein /etc/sysconfig/selinux (runsetenforce 0to do this right away) - Disable the firewall (only when in a secure network!), by running:
systemctl disable --now firewalld - Enable irqbalance:
systemctl enable --now irqbalance.service(probably already enabled and only useful system with more than 1 CPU core) - Edit /etc/chrony.conf and add an NTP server pool:
pool nl.pool.ntp.org iburst
- Or specify a number of NTP servers:
server 0.nl.pool.ntp.org iburst
server 1.nl.pool.ntp.org iburst
server 2.nl.pool.ntp.org iburst
server 3.nl.pool.ntp.org iburst
- Enable the chronyd service:
systemctl enable --now chronyd
- Reboot the system to activate all changes
Installing Ubuntu Server 12.04 LTS
Please note: This instruction was created for my personal use. Feel free to follow it, but I am not responsible for any problems or data loss! Download the Ubuntun 12.04 Server LTS install CD from: http://nl.releases.ubuntu.com/precise/ubuntu-12.04.4-server-amd64.iso- Use English to use during the installation
- Select Country: other; Europe; Netherlands
- Select Country Locale Settings: United States (en_US.UTF-8)
- Detect keyboard layout: No
- Country for the keyboard: English (US)
- Keyboard layout: English (US)
- Select the correct network interface to use for Internet access
- Enter the desired hostname
- Enter the full name for the user to be created
- Enter the new user username
- Enter the password for the new user (twice)
- Choose whether to encrypt the home directory
- A timezone has been select, based on your location. Check whether it is set correctly
- Select Manaul Partitioning
- You may be asked to create a new partition table on the disk, select: Yes
- Create a primary partition for the OS (/), using ext4 and enable the "noatime" option (under mount options), set the Bootable flag to On
- Create a primate partition for swap space (create a swap partition as large as the amount of memory you have)
- Write changes to disk: Yes
- Enter your proxy information to configure the Package Manager (when needed, otherwise, leave empty)
- Select: No automatic updates
- At the Software selection screen, select: OpenSSH server
- Wait for the installation to finish
- Install the GRUB bootloader to the master boot record: Yes
- Reboot the machine and remove the install CD
- Log in to the system using the user you created and become root using: sudo su -
- Set a password for the root user, using: passwd root. You should now be able to log in as root
- Check the network settings in /etc/network/interfaces. Activate any new interfaces by running: ifup
- Make sure root cannot log in via ssh by changing /etc/ssh/sshd_config:
-
PermitRootLogin without-password - This will disable logging in as root, via ssh, but it is still possible to log in as root using SSH public key authentication.
-
- Uncomment the following line in /etc/default/grub:
GRUB_TERMINAL=console - Update the GRUB configuration file by running:
update-grub - Edit /etc/rc.local and add the following line:
/usr/bin/setterm -blank 0This will prevent the screen from going black, which may be helpful in case of a kernel problem. - Add the following line to the end of /etc/profile:
export EDITOR=/usr/bin/vim
- uncomment the following line in /etc/vim/vimrc:
set background=dark - Disable console-setup by running:
update-rc.d -f console-setup remove - Change the following lines in /etc/default/console-setup:
FONTFACE=""
FONTSIZE=""
- Update the system by running:
apt-get update && apt-get -u dist-upgrade - Install a number of extra packages:
apt-get install iotop sysstat ntp iptraf apt-file
- Fetch the packages index for apt-file, by running:
apt-file update - Remove the following installed packages:
dpkg --purge bash-completion command-not-found command-not-found-data
- Reboot the system to activate all changes
My Links
- ATasteOfTWiki - view a short introductory presentation on TWiki for beginners
- WelcomeGuest - starting points on TWiki
- TWikiUsersGuide - complete TWiki documentation, Quick Start to Reference
- Sandbox - try out TWiki on your own
- IvoVanGeelSandbox - just for me
My Personal Preferences
- Show tool-tip topic info on mouse-over of WikiWord links, on or off:
- Set LINKTOOLTIPINFO = off
- Set ALLOWTOPICCHANGE = IvoVanGeel
- More preferences

 TWiki has system wide preferences settings defined in TWikiPreferences. You can customize preferences settings to your needs: To overload a system setting, (1) do a "raw view" on TWikiPreferences, (2) copy a
 Set VARIABLE = valuebullet, (3) do a "raw edit" of your user profile page, (4) add the bullet to the bullet list above, and (5) customize the value as needed. Make sure the settings render as real bullets (in "raw edit", a bullet requires 3 or 6 spaces before the asterisk).
Related Topics
- ChangePassword for changing your password
- ChangeEmailAddress for changing your email address
- TWikiUsers has a list of other TWiki users
- UserDocumentationCategory is a list of TWiki user documentation
- UserToolsCategory lists all TWiki user tools
%WLPARENT% Watchlist
Recent Changes
The watchlist is empty. To watch topics, select the "Watch" menu item on topics of interest.
Watched Topics


- To unwatch multiple topics, uncheck the topics, then click Update Watchlist.
- To watch all topics in a web, check the All checkbox, then click Update Watchlist.
- To have new topics added to your watchlist automatically, check the New checkbox, then click Update Watchlist.
- To add a topic to the list, visit it and click Watch on the menu bar.
Preferences
Klassieke Knorr Wereldgerechten
Kipfilet Romana
Zelf toevoegen:- 300 g kipfilet
- 250 g champignons
- 250 g cherrytomaten
- 150 g gemengde sla
- 250 ml kookroom
- Olie
- Snij de champignons in vieren. Halveer de cherrytomaten en snij de kipfilet in reepjes. Kook de pasta in ruim kokend water in ca. 10 min. gaar en giet af.
- Verhit 2 el olie in een koekenpan en bak hierin de kipreepjes goudbruin en gaar. Voeg de champignons toe en bak deze ca. 3 min. mee.
- Voeg de saus, de kookroom en de cherrytomaten toe en laat het geheel ca. 3 min. zachtjes koken. Voor de salade: meng de dressingmix met 3 el koud water en 3 el olijfolie. Meng de dressing door de sla.
- Serveer de saus over de pasta en serveer de salade apart.
Griekse Kofta
Zelf toevoegen:- 350g gehakt
- 5 tomaten
- 1 courgette
- Olie
- Meng het gehakt met de kruidenmix en draai hier 6 rolletjes van. Snij de courgette in halve plakken en de tomaten in blokjes. Kook de rijstmix in ruim kokend water in ca. 14 min. gaar en giet af.
- Verhit ondertussen 1 el olie in een koekenpan en bak hierin de gehaktrolletjes bruin en gaar. Voeg de courgette toe en bak deze ca. 3 min. mee. Voeg als laatste de tomaten toe en bak deze nog ca. 1 min. mee.
- Voeg dan de sausmix en vervolgens 200 ml water toe. Breng het geheel al roerend aan de kook en laat het nog ca. 3 min. zachtjes doorkoken. Serveer de Kofta en de rijst apart
Hokkien Noedels
Zelf toevoegen:- 400 g kipfilet
- 400 g oosterse roerbakgroente
- Olie
- Laat de mihoen in 1 liter koud water 15 min. wellen. Giet af en laat deze uitlekken.
- Snij de kipfilet in blokjes. Meng de specerijenmix met 2 el olie en marineer hierin de kipblokjes ca. 10 min.
- Verhit een wok en roerbak de kip goudbruin en gaar. Voeg de roerbakgroente toe en bak ca. 5 min. mee. Voeg dan het kruidenblokje samen met 50 ml water toe. Roerbak het geheel totdat het kruidenblokje is opgelost.
- Kook ondertussen de mie 3 min. in ruim kokend water. Maak de mie los met een vork en giet vervolgens af.
- Voeg de mie en mihoen toe aan het mengsel. Roer goed door en verwarm het gerecht nog ca. 2 min. Serveer de Hokkien Noedels.
Kip Piri Piri
Zelf toevoegen:- 300 g kipfilet
- 200 g sperziebonen
- 3 tomaten
- 1 rode paprika
- 1 ui
- 1 komkommer
- 2 el azijn
- Olie
- Snij de paprika in reepjes en de ui in halve ringen. Snij de kipfilet in reepjes. Meng de specerijenmix met 2 el olie en marineer hierin de kipreepjes ca. 10 min. Halveer de sperziebonen en kook ze ca. 5 min. voor.
- Kook ondertussen de rijstmix in ruim kokend water in ca. 14 min. gaar en giet af.
- Verhit ondertussen 1 el olie in een koekenpan en bak hierin de kipreepjes goudbruin en gaar. Voeg de ui, paprika en sperziebonen toe en bak deze nog ca. 4 min. mee.
- Voor de salade: snij de komkommer en tomaten in stukjes. Meng de dressingmix met 3 el water, 2 el azijn en 3 el olie en schep dit door de komkommer- en tomatenstukjes. Serveer de Kip Piri Piri met de rijst en de salade apart.
Surinaamse Roti
Zelf toevoegen:- 350 g kipfilet
- 225 g sperziebonen
- 450 g krieltjes (voorgekookt)
- Olie
- Snij de kipfilet in blokjes. Meng de specerijenmix met 1 el olie en marineer hierin de kipblokjes ca. 10 min. Halveer de sperziebonen en kook ze ca. 5 min. voor. Halveer de krieltjes.
- Verhit 1 el olie in een koekenpan en bak de kipblokjes goudbruin en gaar. Voeg de sausmix en 350 ml water toe en roer goed door. Voeg de sperziebonen en de krieltjes toe, breng het geheel al roerend aan de kook en laat ca. 3 min. zachtjes doorkoken.
- Haal de rotipannenkoeken uit de verpakking en verwarm ze 35 sec. in de magnetron (600 W).
- Vul de rotipannenkoeken met het kipmengsel en vouw ze dicht.
Indiase Kip Madras
Zelf toevoegen:- 350 g kipfilet
- 250 g sperziebonen
- 1 appel
- 125 g crème fraîche
- Olie
- Snij de kipfilet in blokjes. Meng de specerijenmix met 1 el olie en marineer hierin de kipblokjes ca. 10 min.
- Snij de appel in blokjes. Halveer de sperziebonen en kook ze ca. 5 min. voor. Kook ondertussen de rijstmix in ruim kokend water in 14 min. gaar en giet af.
- Verhit 1 el olie in een koekenpan en bak de kipblokjes goudbruin en gaar.
- Voeg de sausmix en 350 ml water toe en breng het geheel al roerend aan de kook. Voeg de appel en de sperziebonen toe en laat het ca. 2 min. zachtjes doorkoken.
- Haal de pan van het vuur en roer de crème fraîche erdoor. Serveer de Kip Madras en de rijst apart van elkaar.
Zuid-Afrikaanse Bobotie
Zelf toevoegen:- 350 g gehakt
- 350 g sperziebonen
- 1 groene appel
- 125 g crème fraîche
- Olie
- Verwarm de (hetelucht) oven voor op 190°C. Halveer de sperziebonen en kook ze ca. 5 min. voor. Snij de appel in blokjes.
- Verhit 1 el olie in een koekenpan en bak het gehakt rul. Voeg de kruidenmix en de sperziebonen toe, roer goed door en bak ca. 5 min. mee.
- Voeg vervolgens de sausmix en 300 ml water toe. Breng het geheel al roerend aan de kook en laat het ca. 3 min. zachtjes doorkoken. Schep de appel en crème fraîche erdoor en verwarm het geheel nog ca. 1 min.
- Giet het mengsel in een ingevette ovenschaal en laat het in de oven in ca. 15 min. goudbruin worden.
- Kook ondertussen de rijstmix in ruim kokend water in ca. 14 min. gaar en giet af. Serveer de Bobotie en de rijst apart van elkaar.
Japanse Teriyaki
Zelf toevoegen:- 350 g biefstuk
- 125 g champignons
- 125 g peultjes
- 3 bosui
- Olie
- Snij de biefstuk in reepjes. Meng de specerijenmix met 2 el olie en marineer hierin de biefstukreepjes ca. 10 min.
- Snij de bosui in smalle ringen en de champignons in vieren. Halveer de peultjes. Kook de rijstmix in ruim kokend water in ca. 14 min. gaar en giet af.
- Verhit ondertussen 1 el olie in een wok en bak de biefstukreepjes ca. 2 min. Voeg de peultjes en champignons toe en bak ca. 3 min. mee. Voeg vervolgens de bosui toe en verwarm het geheel nog ca. 2 min.
- Voeg de sausmix en 350 ml water toe en roer goed door. Breng het geheel aan de kook en verwarm het nog ca. 2 min.
- Serveer de Teriyaki en de rijst apart.
Spaanse Paella
Zelf toevoegen:- 200 g kipfilet
- 200 g gemengde zeevruchten
- 1 ui
- Olie
- Snipper de ui grof en snij de kipfilet in blokjes. Verhit 1 el olie in een hapjespan en bak de kipblokjes goudbruin en gaar. Voeg de ui toe en bak deze ca. 2 min. mee.
- Voeg de rijst en 400 ml water toe en breng het geheel al roerend aan de kook. Voeg dan de kruidenmix en groentemix toe en roer goed door. Laat het met halfgesloten deksel ca. 10 min. zachtjes doorkoken, roer af en toe door.
- Voeg na deze 10 min. de zeevruchten toe en laat het met halfgesloten deksel nog ca. 6 min. zachtjes doorkoken. Roer af en toe door. Serveer de Paella in een grote schaal
Indiase Kip Tandoori
Zelf toevoegen:- 300 g kipfilet
- 150 g peen julienne
- 1 komkommer
- 125 ml crème fraîche
- 150 ml magere yoghurt
- Olie
- Snij de kipfilet in blokjes. Meng de specerijenmix met 2 el olie en marineer hierin de kipblokjes ca. 10 min. Kook ondertussen de rijstmix in ruim kokend water in ca. 14 min. gaar en giet af.
- Voor de Raita: Rasp de komkommer grof. Meng de yoghurt met de raita sausmix en schep de peen julienne en komkommer erdoor.
- Verhit 1 el olie in een koekenpan en bak de kipblokjes goudbruin en gaar.
- Voeg 300 ml water en de sausmix toe en roer goed door. Breng het geheel aan de kook en laat het ca. 1 min. zachtjes doorkoken. Voeg de crème fraîche toe en verwarm deze nog 1 ca. min. mee.
- Serveer de Kip Tandoori, de Raita en de rijst apart van elkaar.
Italiaanse Lasagne Bolognese
Zelf toevoegen:- 300 g gehakt
- 250 g Italiaanse groentemix
- 400 ml melk
- 100 g geraspte kaas
- Verwarm de (hetelucht) oven voor op 190°C. Verhit 1 el olie in een koekenpan en bak het gehakt rul. Voeg de groentemix toe en bak deze ca. 3 min. mee.
- Voeg de sausmix toe en vervolgens 400 ml melk en 250 ml water. Breng het geheel al roerend aan de kook en laat ca. 3 min. zachtjes koken.
- Neem een ingevette ovenschaal, bedek de bodem met een laagje saus en leg hier een laag lasagnebladen op. Herhaal dit tot de lasagnebladen op zijn en eindig met een laagje saus.
- Laat de lasagne in ca. 35 - 40 min. goudbruin worden in het midden van de oven.
Italiaanse Lasagnette Napoletan
Zelf toevoegen:- 300 g gehakt
- 250 g Italiaanse groentemix
- 1 komkommer
- 400 ml melk
- Olie
- Verwarm de (hetelucht) oven voor op 190°C. Verhit 1 el olie in een koekenpan en bak het gehakt rul. Voeg de groentemix toe en bak ca. 3 min. mee.
- Voeg de sausmix, 400 ml melk en 300 ml water toe. Breng het geheel al roerend aan de kook en laat ca. 2 min. zachtjes koken.
- Voeg de mini-lasagnebladen toe en giet het mengsel in een ingevette ovenschaal. Bak de Lasagnette gedurende 35-40 minuten goudbruin.
- Snij ondertussen de komkommer in schijfjes. Meng de dressingmix met 3 el olie en 3 el water en roer dit door de komkommerschijfjes. Serveer de Lasagnette en de salade apart.
Mexicaanse Enchillada's
Zelf toevoegen:- 500 g rundergehakt
- 4 tomaten
- 1 rode paprika
- 150 g maïs (blik)
- 125 g crème fraîche
- Olie
- Snij de paprika en tomaten in blokjes. Verhit 1 el olie in een grote koekenpan en bak het gehakt rul. Voeg de uitgelekte maïs, kruidenmix en 100 ml water toe en bak ca. 2 min. mee.
- Voor de salade: meng de dressingmix met 2 el olie en 2 el water en meng dit met de tomatenblokjes en de paprika.
- Voor de saus: Meng de sausmix met de crème fraîche en 3 el water en roer goed door.
- Verhit de wraps 30 sec. in de magnetron (650 W). Besmeer de wraps met de helft van de saus en verdeel het gehaktmengsel en wat salade erover. Vouw de wraps in elkaar. Serveer de Enchilada's met de overgebleven salade en saus.
Kipfilet Toscana
Zelf toevoegen:- 300 g kipfilet
- 150 g sla naar keuze
- 100 g sperziebonen
- 4 tomaten
- Olie
- Halveer de sperziebonen en kook ze ca. 5 min. voor. Snij de tomaten in blokjes en de kipfilet in reepjes.
- Kook de pasta in ruim kokend water in ca. 10 min. gaar en giet af. Verhit 1 el olie in een koekenpan en bak de kipfiletreepjes goudbruin en gaar.
- Voeg de tomaten, sperziebonen, saus en 150 ml water toe. Breng het geheel al roerend aan de kook en laat het ca. 3 min. zachtjes koken.
- Voor de salade: Meng de dressingmix met 3 el koud water en 3 el olijfolie. Meng de dressing door de sla. Serveer de saus over de pasta en serveer de salade apart.
Chinese Beef Shanghai
Zelf toevoegen:- 350 g rundergehakt
- 100 g taugé
- 1 prei
- Olie
- Snij de prei in halve ringen. Meng de kruidenmix met het gehakt en draai er kleine balletjes van (ca. 15 stuks).
- Verhit 1 el olie in een koekenpan en bak de gehaktballetjes tot ze gaar zijn. Voeg de prei toe en bak deze ca. 2 min. mee. Voeg daarna de taugé toe en bak deze ca. 1 min. mee.
- Voeg de sausmix en 350 ml water toe. Breng het geheel al roerend aan de kook en laat het nog ca. 3 min. zachtjes doorkoken.
- Kook intussen de mie in ruim kokend water in ca. 3 min. gaar. Maak de mie los met een vork en giet het vervolgens af. Doe de mie terug in de pan, voeg de kruidige olie toe en meng goed.
- Serveer de saus en de mie apart.
Italiaanse Risotto
Zelf toevoegen:- 350 g kipfilet
- 250 g champignons
- 1 courgette
- Olie
- Snij de kipfilet in blokjes. Meng de specerijenmix met 2 el olie en marineer hierin de kipblokjes ca. 10 min. Snij de champignons in vieren en de courgette in blokjes.
- Verhit een hapjespan en bak de kipblokjes goudbruin en gaar. Voeg de champignons en courgette toe en bak deze ca. 3 min. mee.
- Voeg de kruidenmix, 500 ml water en de rijstmix toe. Breng het geheel al roerend aan de kook en laat het ca. 17 min. zachtjes doorkoken. Roer af en toe door, totdat het vocht bijna is opgenomen.
- Neem de pan van het vuur, roer het geheel goed door elkaar en laat het ca. 2 min. staan. De Risotto hoort bij het serveren smeuïg te zijn.
Gehaktballetjes Pizzaiola
Zelf toevoegen:- 300 g (mager) rundergehakt
- 3 tomaten
- 1 gele paprika
- 1 courgette
- Olie
- Snij de courgette en de tomaten in blokjes. Snij de paprika in reepjes. Kook de pasta in ruim kokend water in ca. 10 min. gaar en giet af.
- Kneed de kruidenmix door het gehakt en draai er kleine balletjes van (ca. 20 stuks). Verhit 2 el olie in een koekenpan en bak de gehaktballetjes rondom bruin en gaar.
- Voeg de courgette en paprika toe en bak deze ca. 3 min. mee. Voeg vervolgens de tomaten toe en bak deze nog ca. 1 min mee.
- Voeg de saus en 150 ml water toe. Breng het geheel al roerend aan de kook en laat het ca. 3 min. zachtjes doorkoken. Serveer de saus over de pasta.
Mexicaanse Burrito's
Zelf toevoegen:- 300 g kipfilet
- 1 rode paprika
- 1 gele paprika
- 125 g crème fraîche
- 100 g geraspte kaas
- Olie
- Verwarm de (hetelucht) oven voor op 180°C. Snij de paprika's in dunne reepjes en de kipfilet in blokjes. Verhit 1 el olie in een koekenpan en bak de kipfilet goudbruin en gaar. Voeg de paprika's toe en bak deze nog ca. 2 min. mee.
- Voeg dan de kruidenmix en 100 ml water toe en roer goed door. Breng het geheel al roerend aan de kook en laat het ca. 3 min. zachtjes doorkoken.
- Voor de saus: Meng de sausmix met de crème fraîche en 2 el water en roer goed door. Haal de wraps uit de verpakking, verpak ze in aluminiumfolie en verwarm ze 2 min. in de oven.
- Bestrijk de wraps met de helft van de crème fraîche saus, schep het kipmengsel in het midden van de wraps en vouw ze dicht.
- Leg de dichtgevouwen wraps in een ingevette ovenschaal en bestrooi ze met de geraspte kaas. Zet de schaal ca. 8 min. in de oven tot de kaas gesmolten is. Serveer de Burrito's en de rest van de saus apart.
Thaise Kim Siam
Zelf toevoegen:- 350 g kipfilet
- 3 bosui
- Olie
- Snij de bosui in smalle ringen en de kipfilet in reepjes. Kook de rijstmix in ruim kokend water in ca. 14 min. gaar en giet af.
- Verhit 1 el olie in een wok en bak de kipreepjes goudbruin en gaar.
- Voeg 350 ml water en de sausmix toe en roer goed door. Breng het geheel aan de kook en laat ca. 2 min. zachtjes doorkoken. Voeg als laatste de bosui en cashewnoten toe en verwarm nog ca. 1 min. mee.
- Serveer de Kip Siam en de rijst apart van elkaar
My Links
- ATasteOfTWiki - view a short introductory presentation on TWiki for beginners
- WelcomeGuest - starting points on TWiki
- TWikiUsersGuide - complete TWiki documentation, Quick Start to Reference
- Sandbox - try out TWiki on your own
- KoenSuykerlandSandbox - just for me
My Personal Preferences
- Show tool-tip topic info on mouse-over of WikiWord links, on or off:
- Set LINKTOOLTIPINFO = off
- More preferences TWiki has system wide preferences settings defined in TWikiPreferences. You can customize preferences settings to your needs: To overload a system setting, (1) do a "raw view" on TWikiPreferences, (2) copy a
Set VARIABLE = valuebullet, (3) do a "raw edit" of your user profile page, (4) add the bullet to the bullet list above, and (5) customize the value as needed. Make sure the settings render as real bullets (in "raw edit", a bullet requires 3 or 6 spaces before the asterisk).
Related Topics
- ChangePassword for changing your password
- ChangeEmailAddress for changing your email address
- TWikiUsers has a list of other TWiki users
- UserDocumentationCategory is a list of TWiki user documentation
- UserToolsCategory lists all TWiki user tools
Linux Tips And Tricks
Monitoring bandwidth usage
As an alternative to using IPTraf, you can use ifstatus to monitor your network bandwidth usage. Install ifstatus using your package manager and run it as root. TypeI and q when it is running to create an initial configuration file to /root/.ifstatus/ifstatus.cfg. Editing this file and set the interface you want to monitor.
Now run ifstatus again to start monitoring the select interface(s). Press h to see the available keys you can use to change the ifstatus output.
For more information on ifstatus see: http://ifstatus.sourceforge.net/graphic/index.htmlBIOS for Asus M5A97 R2.0 motherboard with support for NVME SSDs
Introduction
I use a Asus M5A97 R2.0 motherboard and recently bought an NVME SSD from AliExpress.Unfortunately the NVME SSD was not found by the UEFI firmware, and booting from the SSD was not possible. After searching the Internet, I found a page where someone was able to modify a BIOS update image to include the NVME driver for the SSD. This UEFI driver can also be included in the BIOS image for the Asus M5A97 R2.0 motherboard. After including it and flashing I was able to boot from the SSD. This page describes the steps to take to update and flash the BIOS image.Including the SSD driver in the BIOS image (optional, see download in the next section)
You will need:- UBU_v1817.rar (UEFI BIOS Updater) package, which includes MMTool. A tool which lets you include extra driver modules in the existing UEFI firmware.
- The NVME UEFI driver found here: https://www.win-unattended.de/Benutzer/Fernando/BIOS-Files/non-Intel/NVMe%20Modules/NvmExpressDxe_4.rar (GUID 5BE3BDF4-53CF-46A3-A6A9-73C34A6E5EE3)
- The original BIOS image (M5A97-R20-ASUS-2603.CAP): https://www.asus.com/us/Motherboards/M5A97_R20/HelpDesk_BIOS/
- A USB stick, formatted as FAT32
- A Windows PC to run MMTool (Running in Wine will probably work as well)
Flashing the new BIOS image
Insert the FAT32 formatted USB stick and copy the new BIOS image, M5A97R20.CAP, to it. Note: the name of the file is important for flashing using the BIOS flashback method. Insert the USB stick into the BIOS flashback port (see the motherboard manual, lowest USB port below the network interface for the M5A97 R2.0).
Make sure your PC is turned off and keep pressing the BIOS flashback button on the motherboard for about 3 seconds. The BIOS flashback LED should now start blinking, which means it is being installed. I think it is blinking slow when the BIOS file is being read from USB and fast when it is being written to the motherboard. When the blinking stops, your new BIOS image has been installed (this can take up to 8 minutes). Turn on your PC, check the BIOS settings and see if the NVME SSD is recognized by UEFI.
Notes
Please note it is possible to create a BIOS update file which contains drivers for both NVME and Samsung XP941 SSDs. Insert both NvmExpressDxe_4.ffs and samsung-m2-dxe into the BIOS update file and flash it using the flashback method. See also: M5A97R20SamsungBIOS Download m5a97r20-both.cap. Rename this file to M5A97R20.CAP before flashing.More information
See the following links for more information:- https://www.win-raid.com/t871f50-Guide-How-to-get-full-NVMe-support-for-all-Systems-with-an-AMI-UEFI-BIOS.html
- http://www.win-raid.com/t154f16-Tool-Guide-News-quot-UEFI-BIOS-Updater-quot-UBU.html
- https://www.asus.com/support/FAQ/1038568/
BIOS for Asus M5A97 R2.0 motherboard with support for Samsung XP941 PCIe SSD
Introduction
I have recently bought a shiny new Asus M5A97 R2.0 motherboard, a Samsung XP941 PCIe SSD and a 4-lane PCIe-adapter (Addonics ADM2PX4). I was hoping to install Linux and Windows on my new SSD, but unfortunately the SSD was not found by the UEFI firmware, and booting from the SSD was not possible. After searching the Internet, I found a page where someone was able to modify a BIOS update image to include the UEFI driver for the Samsung XP941 SSD. This UEFI driver can also be included in the BIOS image for the Asus M5A97 R2.0 motherboard. After including it and flashing I was able to boot from the SSD! This page describes the steps to take to update and flash the BIOS image.Including the SSD driver in the BIOS image (optional, see download in the next section)
You will need:- UBU_v1817.rar (UEFI BIOS Updater) package, which includes MMTool. A tool which lets you include extra driver modules in the existing UEFI firmware.
- The original BIOS image (M5A97-R20-ASUS-2603.CAP)
- A USB stick, formatted as FAT32
- UEFI Samsung M2 driver. I extracted it from the ASRock Fatal1ty 990FX Killer BIOS, version 1.60 (https://download.asrock.com/BIOS/AM3%2b/990FX%20Killer(1.60)ROM.zip). Open 990Kill1.60 in MMTool, navigate to the extract tab and save the SAMSUNG_M2_DXE module to samsung-m2-dxe
- A Windows PC to run MMTool (Running in Wine will probably work as well)
Flashing the new BIOS image
Insert the FAT32 formatted USB stick and copy the new BIOS image, M5A97R20.CAP, to it. Note: the name of the file is important for flashing using the BIOS flashback method. Insert the USB stick into the BIOS flashback port (see the motherboard manual, lowest USB port below the network interface for the M5A97 R2.0).
Make sure your PC is turned off and keep pressing the BIOS flashback button on the motherboard for about 3 seconds. The BIOS flashback LED should now start blinking, which means it is being installed. I think it is blinking slow when the BIOS file is being read from USB and fast when it is being written to the motherboard. When the blinking stops, your new BIOS image has been installed (this can take up to 8 minutes). Turn on your PC, check the BIOS settings and see if the Samsung XP941 SSD is recognized by UEFI.
Notes
Please note it is possible to create a BIOS update file which contains drivers for both NVME and Samsung XP941 SSDs. Insert both NvmExpressDxe_4.ffs and samsung-m2-dxe into the BIOS update file and flash it using the flashback method. See also: M5A97R20NVMEBIOS. Download m5a97r20-both.cap. Rename this file to M5A97R20.CAP before flashing.More information
See the following links for more information:- https://plone.lucidsolutions.co.nz/hardware/motherboard/p8z68-vle/uefi-boot-of-asus-p8z68-vle-with-samsung-xp941/view
- http://www.win-raid.com/t154f16-Tool-Guide-News-quot-UEFI-BIOS-Updater-quot-UBU.html
- https://www.asus.com/support/FAQ/1038568/
Where to find Madsonic 6 source code
The source code for Madsonic 6 can be found at: https://gitlab.com/madsonic/madsonic-mainMy Mountainbike
X-Trail save 5.0 29er (May 2014)
- Frame: Derby Cycle Werke Gmbh P/N: 613429111
- Brakes: BR-M395
- Gear shift: SL-M591
- Front wheelhub: HB-RM66
- Rear wheelhub: FH-RM66
- Shocks: Rockshox XC28
- Front sprocket: 32-24
- Rear sprocket: CS-M771-10 11-36 (was 11-34)
- Front derailler: FD-M781
- Rear derailler: RD-M781 (with Goatlink)
- Bottom bracket: BB-MT800 (was SM-BB70)
- Wheels: 250 disc
- Cranckset: 175 FC-M552
My new mountainbike
Bulls Copperhead 3 Plus (July 2022)
- Frame: Zweirad-Einkaufs-Genossenchaft 21-05-3010
- Shimano groupset: Deore M6100
- Front Brake: BR-MT410
- Rear Brake: BR-MT410
- Gear shift: SL-M6100
- Front wheelhub: HB-MT410-B
- Rear wheelhub: FH-MT410-B
- Front tire: Schwalbe Racing Ralph
- Rear tire: Schwalbe Racing Ralph
- Shocks: Rockshox FS-JDYG-RL-A3 Judy Gold RL
- Front sprocket: PCD 96mm 12S 32T
- Rear sprocket: CS-M6100
- Rear derailler: RD-M6100
- Chain: CN-M6100
- Bottom bracket bearings: SM-BB52
- Cranckset: FC-MT511
- Pedals: PD-ME700
- Wheels: Bulls XC21 Evo
My New Road Bike
- Frame: 2020 new BXT T800 carbon road bike frame cycling bicycle frameset super light 980g Di2/mechanical racing carbon road frame
(https://www.aliexpress.com/item/32868790910.html?spm=a2g0s.9042311.0.0.3ac64c4dRZc7fy)
- WHeels: 2020 BXT Top quality 700c wheelset 50mm clincher 23mm width road carbon wheelset super light Chinese new racing bicycle wheels
(https://www.aliexpress.com/item/32859117482.html?spm=a2g0s.9042311.0.0.27424c4dHBAuCn)
- Steer: TOSEEK full Carbon UD Matte Road Track Bike Bicycle Racing Drop Bar Handlebar 31.8 x 440mm road hanldebar
(https://www.aliexpress.com/item/32858715068.html?spm=a2g0s.9042311.0.0.27424c4dHBAuCn)
- Stem: TOSEEK Ultralight matte UD full carbon fibre mtb mountain bicycle stem parts 17 angle 31.8 x 100mm
(https://www.aliexpress.com/item/32857609972.html?spm=a2g0s.9042311.0.0.27424c4dM0cNlk)
- Control Levers: Shimano Tiagra ST-4700 (2x10s)
- Bottom Bracket: Shimano BB-RS500 Hollowtech II BSA
- Crankset: Shimano Tiagra FC-4700 crankset (52x36)
- Cassette Sprocket: Shimano CS-HG500-10 (11-12-14-16-18-20-22-25-28-32)
- Chain: Shimano CN-HG54
- Front derailler: Shimano Tiagra FD-4700-B (L) 34.9mm
- Rear derailler: Shimano Tiagra RD-4700-GS medium cage
- Front brakes: Shimano Tiagra BR-4700-F
- Read brakes: Shimano Tiagra BR-4700-R
- Brake pads: Shimano R55C4 Carbon
-- My Links
- ATasteOfTWiki - view a short introductory presentation on TWiki for beginners
- WelcomeGuest - starting points on TWiki
- TWikiUsersGuide - complete TWiki documentation, Quick Start to Reference
- Sandbox - try out TWiki on your own
- NewUserTemplateSandbox - just for me
My Personal Preferences
- Show tool-tip topic info on mouse-over of WikiWord links, on or off:
- Set LINKTOOLTIPINFO = off
- More preferences TWiki has system wide preferences settings defined in TWikiPreferences. You can customize preferences settings to your needs: To overload a system setting, (1) do a "raw view" on TWikiPreferences, (2) copy a
Set VARIABLE = valuebullet, (3) do a "raw edit" of your user profile page, (4) add the bullet to the bullet list above, and (5) customize the value as needed. Make sure the settings render as real bullets (in "raw edit", a bullet requires 3 or 6 spaces before the asterisk).
Related Topics
- ChangePassword for changing your password
- ChangeEmailAddress for changing your email address
- TWikiUsers has a list of other TWiki users
- UserDocumentationCategory is a list of TWiki user documentation
- UserToolsCategory lists all TWiki user tools
- %KEY%: %VALUE%%SPLIT%
Notes to TWiki Administrator: Anything inside this "templateonly" section will not be copied to the home topic of the new user. It is a resource for the administrator to tailor the users home topic. The default topic text above is for English speaking users. If you have a multilingual wiki community you can replace the "My Links", "Personal Preferences" and "Related Topics" sections above with the localized text below. Text enclosed in %MAKETEXT will be shown in the language selected by the user. Please note that the %MAKETEXT can be quite intimidating to new users. Consider translating above text to your own language if your community uses a non-English language. (Remove all text from
%STARTSECTION{type="templateonly"}% to %ENDSECTION{type="templateonly"}% when you are done)
Text for multilingual wiki community, copy from here to %ENDSECTION{type="templateonly"}%
My Links
- ATasteOfTWiki - view a short introductory presentation on TWiki for beginners
- WelcomeGuest - starting points on TWiki
- TWikiUsersGuide - complete TWiki documentation, Quick Start to Reference
- Sandbox - try out TWiki on your own
- NewUserTemplateSandbox - just for me
Personal Preferences
- Show tool-tip topic info on mouse-over of WikiWord links, on or off:
- Set LINKTOOLTIPINFO = off
- More preferences TWiki has system wide preferences settings defined in TWikiPreferences. You can customize preferences settings to your needs: To overload a system setting, (1) do a "raw view" on TWikiPreferences, (2) copy a
Set VARIABLE = valuebullet, (3) do a "raw edit" of your user profile page, (4) add the bullet to the bullet list above, and (5) customize the value as needed. Make sure the settings render as real bullets (in "raw edit", a bullet requires 3 or 6 spaces before the asterisk).
Related Topics
- ChangePassword for changing your password
- ChangeEmailAddress for changing your email address
- TWikiUsers has a list of other TWiki users
- UserDocumentationCategory is a list of TWiki user documentation
- UserToolsCategory lists all TWiki user tools
Nobody Group
- Member list:
- Set GROUP =
- Persons/group who can change the list:
- Set ALLOWTOPICCHANGE = TWikiAdminGroup
Wifi router configuratie voor Online.nl glasvezel netwerk
Het online.nl glasvezel netwerk (mogelijk ook andere netwerken van online.nl) maakt gebruik van 2 VLAN's:- VLAN 4 voor IPTV
- VLAN 1001 voor Internet
- het MAC adres van het modem voor VLAN1001 kopieren
- vendor class ID dslforum.org instellen bij de WAN DHCP client opties (optie 60 als het goed is, optie 61 zou ook kunnen: Client Identifier)
config igmpproxy
        option quickleave 1

config phyint
        option network iptv
        option zone wan
        option direction upstream
        list altnet 0.0.0.0/0

config phyint
        option network lan
        option zone lan
        option direction downstream

config interface lan
        option type bridge
        option igmp_snooping 1
Merk op dat ik de IPTV interface iptv heb genoemd en heb toegevoegd aan de wan firewall zone.
-- OpenIndiana KVM Module for AMD CPUs
Installing kernel module
Please note: This module was compiled for the latest version of OpenIndiana, build 151a8. It might also work on other versions of OpenIndiana or OpenSolaris. If it doesn't, please let me know and I will build other versions. Download openindiana-kvm-with-amd-support.tar.gz and copy it to your OpenIndiana system (using scp). Extract the files and copy the files to the following locations:-
cp kvm /kernel/drv/amd64/ -
cp kvm.conf /kernel/drv/ -
cp JOY_kvm_link.so /usr/lib/devfsadm/linkmod/
add_drv kvm
You can verify that the driver installed and attached properly by checking for its presence in /dev:
ls -l /dev/kvm
More information
See the following URLs for more information:- https://github.com/jclulow/illumos-kvm (Fork of illumos-kvm with AMD / SVM support)
- https://github.com/joyent/illumos-kvm
- https://github.com/joyent/illumos-kvm-cmd
Running Netflix on Raspberry Pi 3
Download and install Raspbian onto the SD card
- Download zip file for Raspbian Stretch Lite from: https://downloads.raspberrypi.org/raspbian_lite_latest
- Check the SHA256 hash of the downloaded zip file to make sure it has not been tampered with: sha256sum 2018-04-18-raspbian-stretch-lite.zip
- Expected value for SHA256 hash can be found here: https://www.raspberrypi.org/downloads/raspbian/
- Unzip image file: unzip 2018-04-18-raspbian-stretch-lite.zip && rm -f 2018-04-18-raspbian-stretch-lite.zip
- Write image file to SD card: sudo dd bs=1M if=2018-04-18-raspbian-stretch-lite.img of=/dev/mmcblk0
- Insert the SD card in the Raspberry Pi and boot
- Once the Pi is booted, open a terminal and execute the following commands:
- sudo systemctl enable ssh
- sudo systemctl start ssh
- From now on, you should be able to log in using SSH. Username: pi, password: raspberry. The IP address should be shown while booting. Please note I am using wired ethernet.
- Chaning the password for user pi is highly recommended! This can be done using raspi-config
- sudo systemctl disable avahi-daemon.service bluetooth.service bthelper.service console-setup.service rpi-display-backlight.service rsync.service hciuart.service
- sudo apt-get update
- sudo apt-get upgrade
- sudo systemctl disable avahi-daemon.service bluetooth.service bthelper.service rpi-display-backlight.service rsync.service hciuart.service
- sudo update-rc.d -f console-setup remove
- sudo apt-get install xserver-xorg xinit xserver-xorg-video-fbdev lightdm unclutter ratpoison upower xfonts-100dpi xfonts-75dpi xfonts-scalable lxterminal dbus-x11
- Run the command alsamixer and set the volume for PCM to 100%
- In a terminal, run "sudo raspi-config" and:
- 3 Boot Options -> B1 Desktop / CLI -> B4 Desktop Autologin
- 4 Localisation Options -> I1 Change Locale, enable:
- en_US ISO-8859-1
- en_US.ISO-8859-15 ISO-8859-15
- en_US.UTF-8 UTF-8
- your country locales
- Select the default locale you want to use, I use en_US.UTF-8
- 4 Localisation Options -> I2 Change Timezone
- 4 Localisation Options -> I3 Change Keyboard Layout. I use Generic 104-key PC, English (US), English (US), The default for the keyboard layout, No compose key
- 5 Interfacing Options -> P6 Serial -> Would you like a login shell to be accessible over serial?: No, Would you like the serial port hardware to be enabled?: No
- 7 Advanced Options -> A1 Expand Filesystem (This should have been done at first boot)
- 7 Advanced Options -> A3 Memory Split -> How much memory (MB) should the GPU have? 256
- Edit /boot/config and change (or add) the following lines:
- hdmi_force_hotplug=1
- hdmi_group=1
- hdmi_mode=4 (720p, 60Hz)
- hdmi_ignore_cec_init=1
- reboot the Pi
Install and configure Chromium
- Download and install a version of chromium with Widevine decryption support:
- wget https://github.com/kusti8/chromium-build/releases/download/netflix-1.0.0/chromium-browser_56.0.2924.84-0ubuntu0.14.04.1.1011.deb
- sudo apt-get install gconf-service libgconf-2-4 libnspr4 libnss3 libxss1 libxcb-image0 libnss3 xdg-utils libdbus-glib-1-2 gconf2-common libxcb-util0
- sudo dpkg -i $(pwd)/chromium-browser_56.0.2924.84-0ubuntu0.14.04.1.1011.deb
- wget https://github.com/kusti8/chromium-build/releases/download/netflix-1.0.0/chromium-browser_56.0.2924.84-0ubuntu0.14.04.1.1011.deb
- Edit /etc/lightdm/lightdm.conf and add the following lines:
- [Seat:*]
- xserver-command=X -s 0 dpms
- Create the file /home/pi/.xsession containing:
- ratpoison &
- sleep 1
- while true; do
- chromium-browser
- done
- In Chromium, go to More Tools -> Extensions, go the Chrome Web Store to install the User-Agent Switcher for Chrome (by google.com)
- Right click on the User-Agent Switcher icon and click Options to add a new User Agent:
- Name: Netflix
- User Agent string: Mozilla/5.0 (X11; CrOS armv7l 6946.63.0) AppleWebKit/537.36 (KHTML, like Gecko) Chrome/47.0.2526.106 Safari/537.36
- Group: Chrome
- Append?: Replace
- Indicator Flag: IE
- Click Add
- Once configured, click on the User-Agent Switcher icon and select Chrome -> Netflix
- Sign in to Netflix to see if it now works. Make sure to save the Netflix username and password in Chromium
- Once it does, edit /home/pi/.xsession and change the chromium-browser command to
- chromium-browser --no-startup-window --disable-sync-preferences --kiosk -disk-cache-dir=/dev/shm --disable-reading-from-canvas --start-maximized --app=https://www.netflix.com/
How to root a Land Rover Explore phone
It seems there is no way yet to root this phone. Will update when available Please note: This procedure will erase all data on your phone, make a backup before proceeding!- Power on the Phone and wait until it has started
- Make a connection to the phone and accept the PC connected to it:
adb devices - Reboot the device into fastboot mode:
adb reboot bootloader - Unlock the device:
fastboot oem unlock - Press the Volume Up button to confirm unlocking
- Reboot the device by holding the power button
- The device will reboot a few times to erase all data
How to run strace with full output
Running strace can be extremely useful in troubleshooting. However, running strace without option will only provide abbreviated output. To see the full arguments, you should run strace with the following options:strace -ff -v -s 1024 -o </path/to/outputfile> <command> <command-arguments ...>or:
strace -ff -v -s 1024 -o </path/to/outputfile> -p <process-id>--
Running Open Indiana
Post installation
Enable root login
You might get the following error when trying to log in as root: Roles can only be assumed by authorized users. Change the root account from a role to a normal account by running:rolemod -K type=normal root
Upgrade the system
pkg refresh --full
pkg image-update -nv (shows what will be upgraded)
pkg image-update -v
Mount CDROM
List CDROM/DVD devices using:rmformat -l
Mount CDROM/DVD by running:
mount -F hsfs -o ro /dev/dsk/c4t1d0p0 /cdrom/Please note: The CDROM/DVD may have already been mounted automagically. Check with
mount.
More information
For more information, please see: http://wiki.openindiana.org/oi/OpenIndiana+HandbookTWiki Site Statistics
| Month | Webs Total |
Webs Viewed |
Webs updated |
Topics Total |
Topics Viewed |
Topics Updated |
Attach- ments |
Topic Views |
Topic Updates |
Files Uploads |
Data Size MB |
Pub Size MB |
Disk Use |
Users | Groups | Plugins | Top Contributors |
|---|---|---|---|---|---|---|---|---|---|---|---|---|---|---|---|---|---|
| 2020-04 | 5 | 4 | 0 | 732 | 701 | 0 | 739 | 24611 (1 unique users) |
0 (0 unique users) |
0 (0 unique users) |
346.2 | 490.5 | 5% | 6 | 3 | 18 of 241 | 0 |
| 2020-03 | 5 | 4 | 0 | 732 | 702 | 0 | 739 | 46294 (1 unique users) |
0 (0 unique users) |
0 (0 unique users) |
324.9 | 490.5 | 6% | 6 | 3 | 18 of 241 | 0 |
| 2020-02 | 5 | 4 | 1 | 732 | 702 | 3 | 739 | 80928 (2 unique users) |
6 (1 unique users) |
0 (0 unique users) |
295.1 | 490.5 | 7% | 6 | 3 | 18 of 241 | 6 IvoVanGeel |
| 2020-01 | 5 | 4 | 1 | 731 | 701 | 3 | 739 | 53667 (2 unique users) |
11 (1 unique users) |
0 (0 unique users) |
252.8 | 490.5 | 4% | 6 | 3 | 18 of 241 | 11 IvoVanGeel |
| 2019-12 | 5 | 4 | 1 | 730 | 700 | 1 | 739 | 58985 (2 unique users) |
1 (1 unique users) |
0 (0 unique users) |
222.0 | 490.5 | 4% | 6 | 3 | 18 of 241 | 1 IvoVanGeel |
| 2019-11 | 5 | 4 | 0 | 730 | 700 | 0 | 739 | 69599 (1 unique users) |
0 (0 unique users) |
0 (0 unique users) |
193.4 | 490.5 | 4% | 6 | 3 | 18 of 241 | 0 |
| 2019-10 | 5 | 4 | 1 | 730 | 700 | 2 | 739 | 38780 (2 unique users) |
7 (1 unique users) |
0 (0 unique users) |
160.4 | 490.5 | 2% | 6 | 3 | 18 of 241 | 7 IvoVanGeel |
| 2019-09 | 5 | 4 | 0 | 729 | 699 | 0 | 739 | 47020 (1 unique users) |
0 (0 unique users) |
0 (0 unique users) |
135.6 | 490.5 | 2% | 6 | 3 | 18 of 241 | 0 |
| 2019-08 | 5 | 4 | 0 | 729 | 699 | 0 | 739 | 48098 (1 unique users) |
0 (0 unique users) |
0 (0 unique users) |
116.4 | 490.5 | 2% | 6 | 3 | 18 of 241 | 0 |
| 2019-07 | 5 | 4 | 0 | 729 | 699 | 0 | 739 | 19774 (1 unique users) |
0 (0 unique users) |
0 (0 unique users) |
90.4 | 490.5 | 2% | 6 | 3 | 18 of 241 | 0 |
| 2019-06 | 5 | 4 | 0 | 729 | 699 | 0 | 739 | 48837 (1 unique users) |
0 (0 unique users) |
0 (0 unique users) |
76.9 | 490.5 | 2% | 6 | 3 | 18 of 241 | 0 |
| 2019-05 | 5 | 4 | 0 | 729 | 699 | 0 | 739 | 39539 (1 unique users) |
0 (0 unique users) |
0 (0 unique users) |
58.9 | 490.5 | 2% | 6 | 3 | 18 of 241 | 0 |
| 2019-04 | 5 | 4 | 1 | 729 | 699 | 3 | 739 | 19433 (2 unique users) |
10 (1 unique users) |
0 (0 unique users) |
36.0 | 490.5 | 2% | 6 | 3 | 18 of 240 | 10 IvoVanGeel |
| 2019-03 | 5 | 4 | 1 | 728 | 698 | 1 | 739 | 28665 (2 unique users) |
5 (1 unique users) |
0 (0 unique users) |
27.2 | 490.5 | 2% | 6 | 3 | 18 of 240 | 5 IvoVanGeel |
| 2019-02 | 5 | 4 | 2 | 728 | 660 | 5 | 739 | 3995 (3 unique users) |
11 (2 unique users) |
3 (1 unique users) |
17.2 | 490.5 | 2% | 6 | 3 | 18 of 240 | 9 TWikiAdminUser 5 IvoVanGeel |
| 2018-08 | 5 | 4 | 0 | 726 | 696 | 0 | 732 | 58208 (1 unique users) |
0 (0 unique users) |
0 (0 unique users) |
193.2 | 511.3 | 18% | 6 | 3 | 18 of 242 | 0 |
| 2018-07 | 5 | 4 | 0 | 726 | 696 | 0 | 732 | 55799 (1 unique users) |
0 (0 unique users) |
0 (0 unique users) |
159.8 | 511.3 | 13% | 6 | 3 | 18 of 242 | 0 |
| 2018-06 | 5 | 4 | 1 | 726 | 696 | 3 | 732 | 63994 (2 unique users) |
3 (1 unique users) |
0 (0 unique users) |
138.8 | 511.3 | 13% | 6 | 3 | 18 of 242 | 3 IvoVanGeel |
| 2018-05 | 5 | 4 | 1 | 725 | 695 | 1 | 732 | 43145 (2 unique users) |
1 (1 unique users) |
0 (0 unique users) |
112.7 | 511.3 | 12% | 6 | 3 | 18 of 242 | 1 IvoVanGeel |
| 2018-04 | 5 | 4 | 0 | 725 | 695 | 0 | 732 | 26350 (1 unique users) |
0 (0 unique users) |
0 (0 unique users) |
96.4 | 511.3 | 12% | 6 | 3 | 18 of 242 | 0 |
| 2018-03 | 5 | 4 | 0 | 725 | 695 | 0 | 732 | 35846 (1 unique users) |
0 (0 unique users) |
0 (0 unique users) |
84.0 | 511.3 | 12% | 6 | 3 | 18 of 241 | 0 |
| 2018-02 | 5 | 4 | 0 | 725 | 695 | 0 | 732 | 13310 (1 unique users) |
0 (0 unique users) |
0 (0 unique users) |
65.8 | 511.3 | 12% | 6 | 3 | 18 of 241 | 0 |
| 2018-01 | 5 | 4 | 0 | 725 | 695 | 0 | 732 | 19629 (1 unique users) |
0 (0 unique users) |
0 (0 unique users) |
58.7 | 511.3 | 12% | 6 | 3 | 18 of 241 | 0 |
| 2017-12 | 5 | 4 | 1 | 725 | 695 | 1 | 732 | 12555 (2 unique users) |
17 (1 unique users) |
4 (1 unique users) |
48.0 | 511.3 | 12% | 6 | 3 | 18 of 241 | 21 IvoVanGeel |
| 2017-11 | 5 | 4 | 0 | 725 | 695 | 0 | 729 | 12837 (2 unique users) |
0 (0 unique users) |
0 (0 unique users) |
40.9 | 474.7 | 12% | 6 | 3 | 18 of 241 | 0 |
| 2017-10 | 5 | 4 | 1 | 725 | 695 | 1 | 729 | 25558 (2 unique users) |
4 (1 unique users) |
0 (0 unique users) |
35.2 | 474.7 | 12% | 6 | 3 | 18 of 241 | 4 IvoVanGeel |
| 2017-09 | 5 | 4 | 0 | 725 | 695 | 0 | 729 | 15107 (1 unique users) |
0 (0 unique users) |
0 (0 unique users) |
22.9 | 474.7 | 12% | 6 | 3 | 18 of 241 | 0 |
| 2017-08 | 5 | 4 | 1 | 725 | 581 | 1 | 729 | 5012 (2 unique users) |
1 (1 unique users) |
0 (0 unique users) |
16.9 | 474.7 | 11% | 6 | 3 | 18 of 241 | 1 IvoVanGeel |
| 2017-07 | 5 | 4 | 3 | 725 | 695 | 20 | 729 | 3218 (2 unique users) |
32 (2 unique users) |
4 (2 unique users) |
14.8 | 474.7 | 12% | 6 | 3 | 18 of 241 | 29 IvoVanGeel 7 TWikiAdminUser |
| 2017-06 | 5 | 4 | 1 | 714 | 685 | 1 | 723 | 101074 (2 unique users) |
1 (1 unique users) |
0 (0 unique users) |
160.7 | 40.5 | 10% | 6 | 3 | 18 of 241 | 1 IvoVanGeel |
| 2017-05 | 5 | 4 | 0 | 714 | 685 | 0 | 723 | 145469 (1 unique users) |
0 (0 unique users) |
0 (0 unique users) |
150.9 | 40.5 | 9% | 6 | 3 | 18 of 241 | 0 |
| 2017-04 | 5 | 4 | 1 | 714 | 685 | 2 | 723 | 113732 (2 unique users) |
7 (1 unique users) |
0 (0 unique users) |
137.9 | 40.5 | 9% | 6 | 3 | 18 of 241 | 7 IvoVanGeel |
| 2017-03 | 5 | 4 | 0 | 713 | 684 | 0 | 723 | 113309 (1 unique users) |
0 (0 unique users) |
0 (0 unique users) |
127.3 | 40.5 | 9% | 6 | 3 | 18 of 241 | 0 |
| 2017-02 | 5 | 4 | 1 | 713 | 683 | 1 | 723 | 101037 (2 unique users) |
2 (1 unique users) |
0 (0 unique users) |
116.3 | 40.5 | 8% | 6 | 3 | 18 of 241 | 2 IvoVanGeel |
| 2017-01 | 5 | 4 | 0 | 713 | 683 | 0 | 723 | 76375 (1 unique users) |
0 (0 unique users) |
0 (0 unique users) |
106.9 | 40.5 | 8% | 6 | 3 | 18 of 241 | 0 |
| 2016-12 | 5 | 4 | 1 | 713 | 683 | 1 | 723 | 105211 (2 unique users) |
1 (1 unique users) |
0 (0 unique users) |
98.9 | 40.5 | 8% | 6 | 3 | 18 of 241 | 1 IvoVanGeel |
| 2016-11 | 5 | 4 | 1 | 713 | 683 | 1 | 723 | 103931 (2 unique users) |
1 (1 unique users) |
0 (0 unique users) |
88.9 | 40.5 | 7% | 6 | 3 | 18 of 241 | 1 IvoVanGeel |
| 2016-10 | 5 | 4 | 0 | 713 | 684 | 0 | 723 | 41328 (2 unique users) |
0 (0 unique users) |
0 (0 unique users) |
79.1 | 40.5 | 7% | 6 | 3 | 18 of 241 | 0 |
| 2016-09 | 5 | 4 | 1 | 713 | 683 | 1 | 723 | 23605 (2 unique users) |
1 (1 unique users) |
0 (0 unique users) |
74.4 | 40.5 | 7% | 6 | 3 | 18 of 241 | 1 IvoVanGeel |
| 2016-08 | 5 | 4 | 1 | 713 | 681 | 1 | 723 | 26757 (2 unique users) |
2 (1 unique users) |
0 (0 unique users) |
71.6 | 40.5 | 7% | 6 | 3 | 18 of 241 | 2 IvoVanGeel |
| 2016-07 | 5 | 4 | 1 | 713 | 683 | 2 | 723 | 30583 (2 unique users) |
2 (1 unique users) |
0 (0 unique users) |
68.3 | 40.5 | 7% | 6 | 3 | 18 of 241 | 2 IvoVanGeel |
| 2016-06 | 5 | 4 | 0 | 712 | 682 | 0 | 723 | 26809 (1 unique users) |
0 (0 unique users) |
0 (0 unique users) |
64.7 | 40.5 | 7% | 6 | 3 | 18 of 241 | 0 |
| 2016-05 | 5 | 4 | 0 | 712 | 683 | 0 | 723 | 52183 (2 unique users) |
0 (0 unique users) |
0 (0 unique users) |
61.6 | 40.5 | 7% | 6 | 3 | 18 of 241 | 0 |
| 2016-04 | 5 | 4 | 0 | 712 | 682 | 0 | 723 | 41616 (1 unique users) |
0 (0 unique users) |
0 (0 unique users) |
56.0 | 40.5 | 7% | 6 | 3 | 18 of 240 | 0 |
| 2016-03 | 5 | 4 | 0 | 712 | 683 | 0 | 723 | 32888 (1 unique users) |
0 (0 unique users) |
0 (0 unique users) |
51.0 | 40.5 | 7% | 6 | 3 | 18 of 240 | 0 |
| 2016-02 | 5 | 4 | 0 | 712 | 681 | 0 | 723 | 29879 (1 unique users) |
0 (0 unique users) |
0 (0 unique users) |
47.0 | 40.5 | 7% | 6 | 3 | 18 of 239 | 0 |
| 2016-01 | 5 | 4 | 0 | 712 | 683 | 0 | 723 | 29624 (1 unique users) |
0 (0 unique users) |
0 (0 unique users) |
43.7 | 40.5 | 6% | 6 | 3 | 18 of 239 | 0 |
| 2015-12 | 5 | 4 | 1 | 712 | 683 | 1 | 723 | 28455 (2 unique users) |
1 (1 unique users) |
0 (0 unique users) |
40.4 | 40.5 | 6% | 6 | 3 | 18 of 239 | 1 IvoVanGeel |
| 2015-11 | 5 | 4 | 0 | 712 | 678 | 0 | 723 | 29497 (1 unique users) |
0 (0 unique users) |
0 (0 unique users) |
37.4 | 40.5 | 6% | 6 | 3 | 18 of 239 | 0 |
| 2015-10 | 5 | 4 | 0 | 712 | 683 | 0 | 723 | 22687 (1 unique users) |
0 (0 unique users) |
0 (0 unique users) |
34.2 | 40.5 | 6% | 6 | 3 | 18 of 239 | 0 |
| 2015-09 | 5 | 4 | 0 | 712 | 683 | 0 | 723 | 21898 (1 unique users) |
0 (0 unique users) |
0 (0 unique users) |
31.9 | 40.5 | 6% | 6 | 3 | 18 of 239 | 0 |
| 2015-08 | 5 | 4 | 1 | 712 | 682 | 1 | 723 | 11205 (2 unique users) |
5 (1 unique users) |
0 (0 unique users) |
29.7 | 40.5 | 6% | 6 | 3 | 18 of 239 | 5 IvoVanGeel |
| 2015-07 | 5 | 4 | 1 | 712 | 669 | 1 | 723 | 10443 (2 unique users) |
2 (1 unique users) |
0 (0 unique users) |
28.0 | 40.5 | 6% | 6 | 3 | 18 of 239 | 2 IvoVanGeel |
| 2015-06 | 5 | 4 | 0 | 712 | 510 | 0 | 723 | 4742 (1 unique users) |
0 (0 unique users) |
0 (0 unique users) |
26.0 | 40.5 | 6% | 6 | 3 | 18 of 239 | 0 |
| 2015-05 | 5 | 4 | 0 | 712 | 603 | 0 | 723 | 6010 (1 unique users) |
0 (0 unique users) |
0 (0 unique users) |
24.3 | 40.5 | 6% | 6 | 3 | 18 of 238 | 0 |
| 2015-04 | 5 | 4 | 1 | 712 | 643 | 1 | 723 | 5307 (2 unique users) |
4 (1 unique users) |
0 (0 unique users) |
23.0 | 40.5 | 5% | 6 | 3 | 18 of 238 | 4 IvoVanGeel |
| 2015-03 | 5 | 4 | 0 | 712 | 675 | 0 | 723 | 12230 (2 unique users) |
0 (0 unique users) |
0 (0 unique users) |
22.0 | 40.5 | 5% | 6 | 3 | 18 of 237 | 0 |
| 2015-02 | 5 | 4 | 1 | 712 | 658 | 4 | 723 | 11067 (2 unique users) |
32 (1 unique users) |
1 (1 unique users) |
19.7 | 40.5 | 5% | 6 | 3 | 18 of 237 | 33 IvoVanGeel |
| 2015-01 | 5 | 4 | 1 | 710 | 666 | 2 | 722 | 20859 (2 unique users) |
4 (1 unique users) |
0 (0 unique users) |
17.6 | 24.4 | 5% | 6 | 3 | 18 of 237 | 4 IvoVanGeel |
| 2014-12 | 5 | 4 | 2 | 709 | 680 | 5 | 722 | 13265 (2 unique users) |
9 (2 unique users) |
3 (1 unique users) |
13.8 | 24.4 | 6% | 6 | 3 | 18 of 236 | 7 TWikiAdminUser 5 IvoVanGeel |
| 2014-11 | 5 | 4 | 1 | 659 | 621 | 2 | 522 | 7459 | 3 | 0 | 69.6 | 12.7 | 6% | 6 | 3 | 17 of 236 | 3 IvoVanGeel |
| 2014-10 | 5 | 4 | 0 | 658 | 619 | 0 | 522 | 12833 | 0 | 0 | 68.0 | 12.7 | 6% | 6 | 3 | 17 of 236 | 0 |
| 2014-09 | 5 | 4 | 0 | 658 | 619 | 0 | 522 | 11179 | 0 | 0 | 65.1 | 12.7 | 6% | 6 | 3 | 17 of 231 | 0 |
| 2014-08 | 5 | 4 | 0 | 658 | 592 | 0 | 522 | 5849 | 0 | 0 | 62.3 | 12.7 | 6% | 6 | 3 | 17 of 231 | 0 |
| 2014-07 | 5 | 4 | 1 | 658 | 620 | 2 | 522 | 16929 | 8 | 0 | 61.4 | 12.7 | 6% | 6 | 3 | 17 of 231 | 8 IvoVanGeel |
| 2014-06 | 5 | 4 | 1 | 658 | 618 | 2 | 522 | 9765 | 5 | 0 | 58.1 | 12.7 | 6% | 6 | 3 | 17 of 230 | 5 IvoVanGeel |
| 2014-05 | 5 | 4 | 1 | 657 | 604 | 1 | 522 | 6632 | 4 | 0 | 55.2 | 12.7 | 5% | 6 | 3 | 17 of 230 | 4 IvoVanGeel |
| 2014-04 | 5 | 4 | 0 | 657 | 621 | 0 | 522 | 12701 | 0 | 0 | 54.0 | 12.7 | 5% | 6 | 3 | 17 of 230 | 0 |
| 2014-03 | 5 | 4 | 1 | 657 | 621 | 1 | 522 | 12760 | 3 | 0 | 50.7 | 12.7 | 5% | 6 | 3 | 17 of 230 | 3 IvoVanGeel |
| 2014-02 | 5 | 4 | 1 | 657 | 621 | 4 | 522 | 7260 | 11 | 0 | 47.8 | 12.7 | 5% | 6 | 3 | 17 of 228 | 11 IvoVanGeel |
| 2014-01 | 5 | 4 | 1 | 656 | 615 | 3 | 522 | 6504 | 10 | 1 | 44.9 | 12.7 | 5% | 6 | 3 | 17 of 226 | 11 IvoVanGeel |
| 2013-12 | 5 | 4 | 0 | 655 | 619 | 0 | 521 | 5650 | 0 | 0 | 42.7 | 12.3 | 5% | 6 | 3 | 17 of 226 | 0 |
| 2013-11 | 5 | 4 | 2 | 655 | 619 | 3 | 521 | 13131 | 5 | 0 | 41.1 | 12.3 | 4% | 6 | 3 | 17 of 226 | 5 IvoVanGeel |
| 2013-10 | 5 | 4 | 0 | 654 | 618 | 0 | 521 | 7973 | 0 | 0 | 38.9 | 12.3 | 4% | 6 | 3 | 17 of 226 | 0 |
| 2013-09 | 5 | 4 | 0 | 654 | 626 | 0 | 521 | 7956 | 0 | 0 | 37.6 | 12.3 | 4% | 6 | 3 | 17 | 0 |
| 2013-08 | 5 | 4 | 2 | 654 | 618 | 3 | 521 | 43297 | 11 | 0 | 35.9 | 12.3 | 4% | 6 | 3 | 17 of 226 | 11 IvoVanGeel |
| 2013-07 | 5 | 4 | 0 | 653 | 244 | 0 | 521 | 904 | 0 | 0 | 24.5 | 12.3 | 4% | 6 | 3 | 17 of 225 | 0 |
| 2013-06 | 5 | 5 | 1 | 653 | 617 | 6 | 521 | 7241 | 15 | 0 | 24.3 | 12.3 | 4% | 6 | 3 | 17 of 225 | 11 IvoVanGeel 2 TWikiAdminUser 2 TWikiRegistrationAgent |
| 2013-05 | 5 | 4 | 1 | 649 | 618 | 1 | 521 | 4940 | 2 | 0 | 23.4 | 12.3 | 4% | 6 | 3 | 17 of 225 | 2 IvoVanGeel |
| 2013-04 | 5 | 4 | 0 | 641 | 575 | 0 | 521 | 7282 | 0 | 0 | 18.7 | 11.4 | 9% | 6 | 3 | 17 of 224 | 0 |
| 2013-03 | 5 | 4 | 0 | 641 | 585 | 0 | 521 | 3502 | 0 | 0 | 16.5 | 11.4 | 8% | 6 | 3 | 17 of 223 | 0 |
| 2013-02 | 5 | 4 | 0 | 641 | 580 | 0 | 521 | 3562 | 0 | 0 | 15.6 | 11.4 | 8% | 6 | 3 | 17 of 222 | 0 |
| 2013-01 | 5 | 4 | 0 | 641 | 409 | 0 | 521 | 3035 | 0 | 0 | 14.8 | 11.4 | 8% | 6 | 3 | 17 of 221 | 0 |
| 2012-12 | 5 | 4 | 0 | 641 | 449 | 0 | 521 | 2658 | 0 | 0 | 14.3 | 11.4 | 8% | 6 | 3 | 17 of 221 | 0 |
| 2012-11 | 5 | 4 | 0 | 641 | 589 | 0 | 521 | 3575 | 0 | 0 | 13.7 | 11.4 | 8% | 6 | 3 | 17 of 219 | 0 |
| 2012-10 | 5 | 5 | 1 | 641 | 414 | 4 | 521 | 2767 | 28 | 0 | 13.1 | 11.4 | 8% | 6 | 3 | 17 of 218 | 26 IvoVanGeel 1 TWikiAdminUser 1 TWikiRegistrationAgent |
| 2012-09 | 5 | 5 | 1 | 666 | 535 | 3 | 521 | 2180 | 5 | 0 | 12.8 | 11.4 | 7% | 7 | 3 | 17 of 217 | 2 TWikiAdminUser 2 TWikiRegistrationAgent 1 IvoVanGeel |
| 2012-08 | 5 | 5 | 1 | 664 | 452 | 3 | 521 | 2732 | 6 | 0 | 12.3 | 11.4 | 7% | 6 | 3 | 17 of 216 | 2 IvoVanGeel 2 TWikiAdminUser 2 TWikiRegistrationAgent |
| 2012-07 | 5 | 5 | 1 | 658 | 417 | 5 | 521 | 2577 | 25 | 2 | 11.7 | 11.4 | 8% | 7 | 3 | 17 of 215 | 25 IvoVanGeel 1 TWikiAdminUser 1 TWikiRegistrationAgent |
| 2012-06 | 5 | 5 | 1 | 656 | 364 | 4 | 519 | 1954 | 7 | 0 | 11.2 | 11.2 | 7% | 9 | 3 | 17 of 215 | 3 TWikiAdminUser 3 TWikiRegistrationAgent 1 IvoVanGeel |
| 2012-05 | 5 | 5 | 1 | 653 | 401 | 3 | 519 | 2224 | 4 | 0 | 10.8 | 11.2 | 8% | 7 | 3 | 17 of 214 | 2 IvoVanGeel 1 TWikiAdminUser 1 TWikiRegistrationAgent |
| 2012-04 | 5 | 5 | 1 | 652 | 368 | 3 | 519 | 1656 | 7 | 0 | 10.3 | 11.2 | 7% | 7 | 3 | 17 of 211 | 3 IvoVanGeel 2 TWikiAdminUser 2 TWikiRegistrationAgent |
| 2012-03 | 5 | 5 | 1 | 650 | 418 | 12 | 519 | 2044 | 24 | 0 | 9.9 | 11.2 | 7% | 8 | 3 | 17 of 211 | 10 TWikiAdminUser 10 TWikiRegistrationAgent 4 IvoVanGeel |
| 2012-02 | 5 | 5 | 3 | 640 | 417 | 9 | 519 | 1542 | 34 | 0 | 9.4 | 11.2 | 6% | 7 | 3 | 17 of 210 | 23 TWikiAdminUser 10 IvoVanGeel 1 TWikiRegistrationAgent |
|
|
- Do not edit this topic, it is updated automatically. Update now.
- When updating statistics of previous months, the following items cannot be measured and will be set to 0: Webs, Topics, Users, Data Size, Pub Size, Disk Use, Plugins.
- Charts are automatically shown at the top if the TWiki:Plugins.ChartPlugin is installed and enabled (it is not) and if there are at least two months of statistics data. ChartPlugin version 2011-04-27 or later is required.
- TWikiSiteTools explains how to enable automatic updates of the statistics pages.
Spice XPI Plugin
Here you can download the Spice XPI plugin for Linux, version 2.7.0, available in both in a 32bits and a 64bits version. It was built on a Gentoo system, using the patches provided by Redhat, using the Gecko SDK version 13.0.1. The source code was downloaded from: http://ftp.redhat.com/pub/redhat/linux/enterprise/6Server/en/os/SRPMS/spice-xpi-2.7-20.el6.src.rpm#!/bin/sh logger -t spice "starting remote-viewer --spice-controller $@..." env | logger -t spice exec remote-viewer --spice-controller "$@" 2>&1 | logger -t spice logger -t spice "remote-viewer execution failed"Make the script executable by running: chmod +x /usr/libexec/spice-xpi-client-remote-viewer, then create a link from /usr/libexec/spice-xpi-client:
ln -s spice-xpi-client-remote-viewer /usr/libexec/spice-xpi-client--
tv_grab_nl_py (revision 105)
It seems the latest version of tv_grab_nl_py (revision 104) can't handle the new TVGids.nl layout and fails to retrieve program details. I updated the script to handle the new layout and sent an e-mail to Paul de Bruin, who owns the Google Code website for tvgrabnlpy, but I never received any reply from him. So I decided to host the new revision myself (revision 105).Update (revision 107)
There were some errors in revision 105. I fixed them and created a new revision: 107. It should now work properly and is able to handle special characters in the Category as well (I had problems with an '&', which is now translated to '&', making the XML valid). Get the latest version here: tv_grab_nl_py-r107. -- IvoVanGeel - 05 Jan 2011TWiki Administrator Group
This is a super user group that has access to all content, regardless of access control. This group has also access to the configure script to do system level configuration.- Member list (comma-separated list):
- Set GROUP = IvoVanGeel
- Persons/group who can change the list:
- Set ALLOWTOPICCHANGE = TWikiAdminGroup
How to login as TWikiAdminUser
- Login as the internal TWiki administrator:
- TWiki is configured using ApacheLogin, please login as a normal user first. Then the Admin Login will replace this text
- Logout from Administrator:
lib/LocalSite.cfg file and deleting the line that starts with $TWiki::cfg{Password} and then set it again by saving your settings in configure.
How to add the first administrator:
If you haven't previously set up an administrator, follow these steps:
If you haven't previously set up an administrator, follow these steps:
- Authenticate as the internal TWiki administrator:
- TWiki is configured using ApacheLogin, please login as a normal user first. Then the Admin Login will replace this text
- Edit this topic
- Insert the wikinames of admin users in the TWiki Administrator Group by listing them in the GROUP setting
(example* Set GROUP = JohnSmith, JamesBond) - Save this topic
- Logout from the Internal TWikiAdminUser
- Verify that new members show up properly in the group listing at TWikiGroups
- Make sure always to keep this topic write protected by keeping the already defined ALLOWTOPICCHANGE setting
- The ALLOWTOPICHANGE and ALLOWTOPICRENAME settings in TWiki.TWikiPreferences and Main.TWikiPreferences have already been set to this group (TWikiAdminGroup), restricting edit of site-wide preferences to the TWiki Administrator Group
TWiki Administrator User
The TWikiAdminUser has been added to TWiki to make it possible to login without needing to create a TWiki User, or to temporarily login as TWikiAdminUser using the password set in configure, and then log back out to the same User and Group as before. This means it is no longer necessary to add yourself to the TWikiAdminGroup, and you will be able to quickly change to Admin User (and back to your user) only when you need to.How to login as TWikiAdminUser
- Login as the internal TWiki administrator:
- TWiki is configured using ApacheLogin, please login as a normal user first. Then the Admin Login will replace this text
- Logout from Administrator:
lib/LocalSite.cfg file and deleting the line that starts with $TWiki::cfg{Password} and then set it again by saving your settings in configure.
Prerequisites
-
Security Setup : Sessions : {UserClientSession}needs to be enabled in configure - A configure password (otherwise the Admin login is automatically disabled.)
- If your TWiki is configured to use ApacheLoginManager, you will need to log in as a valid user first.
TWiki Contributor
Not an actual user of this site, but a person devoting some of his/her time to contribute to the Open Source TWiki project. TWikiContributor lists the people involved. Related topics: TWikiUsers, TWikiRegistrationUse this group for access control of webs and topics.
- Member list:
- Set GROUP = TWikiGuest
- Purpose of this group:
- Set DESCRIPTION =
- Persons/group who can change the list:
- Set ALLOWTOPICCHANGE =
TWiki Groups
Use these groups to define fine grained access control in TWiki:| Group | Members |
|---|---|
| TWikiBaseGroup | TWikiAdminUser, TWikiGuest, UnknownUser, TWikiContributor, TWikiRegistrationAgent |
| AllAuthUsersGroup | All authenticated users. |
| AllUsersGroup | All users including unauthenticated users. |
| NobodyGroup | |
| TWikiAdminGroup | TWikiAdminUser, IvoVanGeel |
- There is enough peer pressure to post only appropriate content.
- Content does not get lost because topics are under revision control.
- A topic can be rolled back to a previous version.
The TWikiGuest User
A guest of this TWiki site, or a user who is not logged in.- Welcome Guest - look here first
- Tutorial - 20 minutes TWiki tutorial
- User's Guide - documentation for TWiki users
- Frequently Asked Questions - about TWiki
- Reference Manual - documentation for system administrators
- Site Map - to navigate to content
Local customizations of site-wide preferences
Site Specific Site-wide Preferences
- Set WEBBGCOLOR = #0708ff
- Set WEBLOGOIMG =

- Set WEBLOGOURL = http://www.lanis.nl/twiki/bin/view/LANIS/WebHome
- Set WEBLOGOALT = LANIS
- Set SITEMAPWHAT = LANIS
- Set WEBCOPYRIGHT = Copyright © 2010-2019 by LANIS
- Set WEBRSSCOPYRIGHT = Copyright 2010-2019 by LANIS
- Set WIKIWEBLIST = LANIS | Main | Sandbox | TWiki
- Set SKIN = lanis, pattern
- Set EDITMETHOD = raw
- Set ATTACHFILESIZELIMIT = 300000
- Image and URL of the logo of this TWiki installation:
- Set WIKILOGOIMG = /pub/TWiki/TWikiLogos/T-logo-140x40-t.gif
- Example URL if logo attached to this topic: /pub/Main/TWikiPreferences/my-logo-100x50.png
- Set WIKILOGOURL = https://www.lanis.nl/do/view/Main/WebHome
Final Preferences
-
FINALPREFERENCESlocks site-level preferences that are not allowed to be overridden by WebPreferences or user preferences:- Set FINALPREFERENCES = ALLOWROOTCHANGE, ATTACHFILESIZELIMIT, DENYROOTCHANGE, DOCWEB, ICONTOPIC, PREVIEWBGIMAGE, SYSTEMWEB, TWIKICOLORSURL, TWIKILAYOUTURL, TWIKISTYLEURL, USERSWEB, WIKIHOMEURL, WIKITOOLNAME
Security Settings
- Only TWiki administrators are allowed to change this topic:
- Set ALLOWTOPICCHANGE = TWikiAdminGroup
- Set ALLOWTOPICRENAME = TWikiAdminGroup
- Disable WYSIWYG editor for this preferences topic only:
- Local TINYMCEPLUGIN_DISABLE = on
The TWikiRegistrationAgent User
This is a TWiki user used by TWiki when it registers new users. This user has special access to write to TWikiUsers, and does not have an entry in the password system. Related topics: TWikiUsers, TWikiRegistrationList of TWiki Users
Below is a list of users with accounts. If you want to edit topics or see protected areas of the site then you can get added to the list by registering: fill out the form in TWikiRegistration. If you forget your password, ResetPassword will get a new one sent to you. Related topics: TWikiGroups, UserList, UserListByDateJoined, UserListByLocation, UserListByPhotograph, UserReportsA B C D E F G H I J K L M N O P Q R S T U V W X Y Z
- A - - - - -
- B - - - - -
- C - - - - -
- D - - - - -
- E - - - - -
- F - - - - -
- G - - - - -
- H - - - - -
- I - - - - -
- IvoVanGeel - ivo - 14 Oct 2010
- J - - - - -
- K - - - - -
- L - - - - -
- M - - - - -
- N - - - - -
- O - - - - -
- P - - - - -
- Q - - - - -
- R - - - - -
- S - - - - -
- T - - - - -
- TWikiContributor - 2005-01-01
- TWikiGuest - guest - 1999-02-10
- TWikiRegistrationAgent - 2005-01-01
- U - - - - -
- UnknownUser - 2005-01-01
- V - - - - -
- W - - - - -
- X - - - - -
- Y - - - - -
- Z - - - - -
- TWikiContributor - placeholder for a TWiki developer, and is used in TWiki documentation
- TWikiGuest - guest user, used as a fallback if the user can't be identified
- TWikiRegistrationAgent - special user used during the new user registration process
- UnknownUser - used where the author of a previously stored piece of data can't be determined
- Set ALLOWTOPICCHANGE = TWikiAdminGroup, TWikiRegistrationAgent
Univention Development Setup
Introduction
This document describes the changes needed to install a machine on which Univention packages can be built and developed.Setting up for development
Start with an installed Univention machine and apply the following changes:- ucr set repository/online/unmaintained=yes
- ucr set repository/online/sources=yes
- apt-get update
- apt-get install subversion build-essential
- apt-get source <package>
- dpkg-buildpackage -uc -us -b
More information
See http://docs.univention.de/developer-reference-3.2.htmlThe UnknownUser User
UnknownUser is a reserved name in TWiki. If the UnknownUser appears, it is probably because author information for a topic could not be recovered, perhaps because a topic has been modified by a non-TWiki tool. Related topics: TWikiUsers, TWikiRegistrationUser Form
| Name | Type | Size | Values | Tooltip message | Attributes |
|---|---|---|---|---|---|
| FirstName | text | 40 | |||
| LastName | text | 40 | |||
| OrganisationName | text | 40 | |||
| OrganisationURL | text | 40 | |||
| Profession | text | 40 | |||
| Country | text | 40 | |||
| State | text | 40 | |||
| Address | text | 40 | |||
| Location | text | 40 | |||
| Telephone | text | 40 | |||
| VoIP | text | 40 | |||
| InstantMessaging (IM) | textarea | 50x4 | (One account per line, if several) | ||
| text | 40 | ||||
| HomePage | text | 40 | |||
| Comment | textarea | 50x6 |
Header of User Homepages
Note: This is a maintenance topic, used by the TWiki administrator. The part between the horizontal rules gets included at the top of every TWikiUsers homepage. The header can be customized to the needs of your organization. For example, show all frequently used fields from the UserForm on top, followed by a personalized portal. The portal can pull content from other places, such as headline news by department, a list of current projects, etc. The TWiki:TWiki.UserHomepageSupplement| Organization: | Country: | Location: | |||||
| Telephone: | E-mail: |
Related topics: TWikiUsers, UserForm, NewUserTemplate, TWikiRegistration, TWikiForms
TWiki User List
Related topics: TWikiGroups, TWikiUsers, UserListByDateJoined, UserListByLocation, UserListByPhotograph, UserReports
Filter:
Clear
Total: 2 entries
Related topics: TWikiGroups, TWikiUsers, UserListByDateJoined, UserListByLocation, UserListByPhotograph, UserReportsUser List sorted by date joined / updated
Related topics: TWikiGroups, TWikiUsers, UserList, UserListByLocation, UserListByPhotograph, UserReports Could not perform search. Error was: /usr/bin/grep -E -l -H -- %TOKEN|U% %FILES|F% Grep for '^%META:FORM{.*\bname=\".*UserForm\"' returned errorUser List sorted by location
Related topics: TWikiGroups, TWikiUsers, UserList, UserListByDateJoined, UserListByPhotograph, UserReports Could not perform search. Error was: /usr/bin/grep -E -l -H -- %TOKEN|U% %FILES|F% Grep for '^%META:FORM{.*\bname=\".*UserForm\"' returned errorUser List showing all photographs
Related topics: TWikiGroups, TWikiUsers, UserList, UserListByDateJoined, UserListByLocation, UserReports %IMAGEGALLERY{thumbtitle="$topic" topics="IvoVanGeel,KoenSuykerland,NewUserTemplate" size="large" title="$topic"}% If TWiki:Plugins.ImageGalleryPluginRelated topics: TWikiGroups, TWikiUsers, UserList, UserListByDateJoined, UserListByLocation, UserListByPhotograph, UserReports
Header of User Profile Pages
Note: This is a maintenance topic, used by the TWiki Administrator. The part between the horizontal rules gets included at the top of every TWikiUsers profile page. The header can be customized to the needs of your organization. The TWiki:TWiki.UserHomepageSupplement

|
|
| |||||||||||||||
Info:
|
|
Watchlist Changes of :
| |||||||||||||||
- Set ALLOWTOPICCHANGE = TWikiAdminGroup
Number of topics: 64
Topic revision: r55 - 02 Sep 2023 - IvoVanGeel
